| Construction Rating: | starstarstarstarstar_border |
| Flight Rating: | starstarstarstarstar_border |
| Overall Rating: | starstarstarstarstar_border |
| Manufacturer: | Model Minutes  |

Brief:
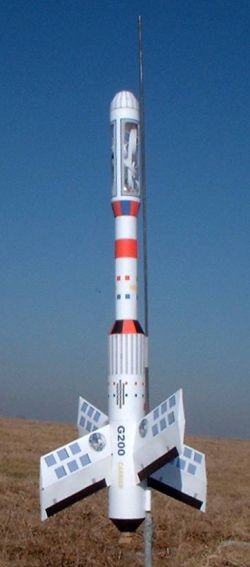
This is a monster of a paper rocket, capable of handling 24mm motors and carrying payloads. Paper rockets in general are always a nice break from the routine and this one is certainly a break from the paper rocket norm. I had the pleasure of building a beta version of this as well as the final version. This review is based on the final version.
Construction:
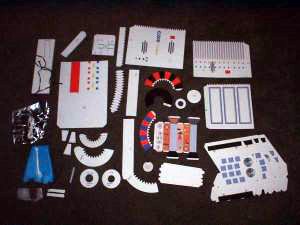
The parts list for this Model Minutes kits is pretty straightforward: cardstock. Lots of it. There are also a few other items, like motor clip, plastic chutes, clay weight, and clear plastic film for the payload section, but the main components are preprinted on cardstock.
Since their recent re-entry into the US market, Model Minutes has managed to eliminate two of my biggest peeves with their instructions. #1 was the hokey 3-D glasses necessary to view the photos in the instructions, and #2 is the poorly translated (from French) instructions. These instructions were fairly well written, easy to follow, and don't require the use of glasses (the instructions do however incorrectly reflect the process for making the 3-D glasses).
The motor mount consists of a rolled paper 24mm tube, metal hook (retained via thread), and centering rings cut from foamboard stock. This is then glued into a rolled paper fuselage. Once in place, a rolled tailcone trims the aft end.
 The standard kit includes only one launch lug, mounted at the rear of the rocket but at least offers an optional second lug towards the top. Go for the second option--this is way too top heavy and tall for a single lug at the base.
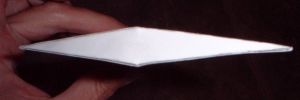
Fin construction is a bit of a pain and might have you wishing for laser cut balsa. The fins are formed into diamond-shaped "airfoils", reinforced with internal braces. I had a lot of trouble figuring this out on the beta, but the photos in the final version make this a bit easier to understand. There's just a lot of forming and gluing involved.
 One general tip I'll offer up for forming "sharp" lines on the cardstock: on the back of the line, lightly score the line with the back end of a utility knife blade (or use a really old/dull one). This will make it a lot easier to fold on a nice crisp line. This is especially important since there are lots of folds on the fins.
The rest of the fuselage and lower body is made by rolling another body tube, a tube coupler, and a transition, then gluing everything together with very light amounts of white glue. That's another tip I'll offer up: avoid yellow wood glue, as it shrinks and can discolor the paper. White glue shrinks less and tends to dry clear.
The upper body tube (junction) is formed by rolling another cardstock piece.
The payload section consists of a coupler, a cardstock transition, and a rolled tube. Once the tube is rolled and glued into shape, you cut out 3 sections for windows. This is a bit tricky and requires a very fresh, sharp blade. The first cut is easy, but since you're cutting away most of the structure leaving only thin frames from the original cardstock, you're cutting on an increasingly more flimsy surface. I wound up putting this over a piece of PVC pipe and using the pipe as a cutting surface. Once you've cut out the windows, insert the clear plastic liner and glue it in place with plastic model cement. Go light and be careful to avoid smearing!
The nose cone is made from 3 different transition sections forming a somewhat "rounded" look rather than a straight cone. You'll need to add in plenty of the provided nose weight for stability.
 There's an optional satellite you can build and use as a payload. I wound up building it just because it looked kind of cool and it was simple. It's basically just forming a hexagon and folding over end caps.
There are 2 plastic chutes included, one for the satellite and one for the rocket. The shroud lines are a bit short for the chute size but would probably work fine. Personally, I usually substitute one of my heavy duty mylar chutes from my range box.
Finishing:
The beauty of paper rockets is that there is no finishing involved. The colors and printed patterns are already on the parts so there is no pesky masking. Plus there are no spirals or balsa grain to fill.
Construction Rating: 4 out of 5
Flight:
I had one flight on the prototype beta version using a D12-3. It was a pretty good flight, unfortunately the payload section was blown out by the ejection charge.
For the final version of the released kit, I stuck with the D12-3 but put in at least 3 inches of dog barf stuffed all the way down into the skinny transition tube followed by a good 5-6 squares of recovery wadding in the payload. I left out the satellite figuring I'd leave more room for wadding and the chute.
The flight was excellent. Despite 10-12 mph winds, it held a fairly straight path and deployed right at apogee.
Recovery:
The 12" chute is a bit small for this, but it landed fairly gently in tall, soft grass. Once again though, I had blown out the clear plastic payload section. Although this time it was still mostly intact, so can be taped or glued back together fairly easily.
Flight Rating: 4 out of 5
Summary:
For a paper rocket, this one is right up there with the Model Minutes XFLR-7 among my favorite designs. It's big, nicely colored, and detailed. It flies great on a D12 too. The upgrades and improvements incorporated into the final version make this a worthwhile project.
Overall Rating: 4 out of 5
Other Reviews
- Model Minutes G-200 Carrier By Dick Stafford
Brief: The G-200 is a large paper rocket that flies on 24mm motors. The diameter of the lower tube is about 2 3/8" vs the 2" in the specs above the first review--just a skosh too small to fit the Fat Boy cone that was sitting by my computer. It features a clear payload section (one of the few non-paper components) and two build options. The Orbital Launcher option deploys a ...
 |
 |
Flights
Sponsored Ads
 |
 |


