| Construction Rating: | starstarstarstarstar |
| Flight Rating: | starstarstarstarstar |
| Overall Rating: | starstarstarstarstar |
Brief:
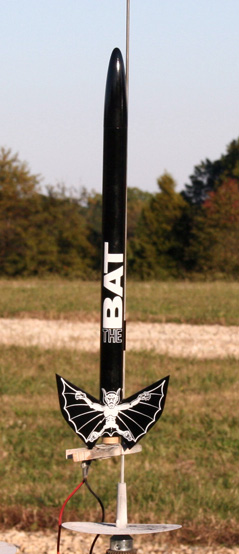
Estes The BAT has a unique fin design, and some really cool bat decals. This is a skill level 1 design that is very
easy to clone and the design performs very well. Combined with the trademarked black color scheme, it's just one cool
looking rocket.
Construction:
All materials needed to build are easily purchased.:
- Body Tube-BT-50
- Engine Tube-BT-20
- Engine Hook-EH-2
- (2) Centering Rings (2050)
- Nose Cone-BNC-50X
- Launch Lug-1/8"
- Balsa Fin Stock 3/32"
- 1/8" Shockcord material
Construction is typical Estes. The first part of assembly is the motor mount. At this point the builder has the option of upgrading to a Kevlar® shock cord that attaches to the motor mount. Since we are cloning, the next step is to make a pattern for the fins out of poster board. Using 3/32" hard balsa, lay your pattern out paying attention to grain direction. After cutting out the fins, it's important that you pin the fins together to sand to the final shape. This provides you with three fins that are identical in size and shape. Next up you can fill the body tubes spirals, mark the BT with the fin and launch lug locations. Attach the fins, a launch lug using your favorite method. Install motor mount, and eye hook in the balsa nose cone.
Finishing:
First, I applied two coats of Minwax Polyurethane®
to the fins and nose cone. I do this because I believe it hardens and strengthens the balsa with very little weight
penalty. Next, I sprayed a coat of Duplicolor High Fill®
primer and sanded when dry. I repeated with a second coat which successfully removed all spirals and wood grain. For
the color coats, I used two coats of Valspar Premium Spray Paint®.
This paint is available at Lowes™
and produces a very good finish that's a step above Krylon™.
Finally, the final step is to install the great looking decals that Excelsior provided. The result is a great looking
rocket.
Construction Rating: 5 out of 5
Flight:
As you can see from the recommended motor list, The Bat will fly on a wide range of motors. For the first flight
selected the B6-4. I use a small 8" parachute instead of the streamer to try and minimize damage. We had about
5mph winds for the launch that proved to be no issue for this rocket. The Bat left the pad in a hurry gaining close to
800 to 900 feet, I'm guessing. The boost was arrow straight with ejection occurring at slight nose up. Recovered the
model fairly close to the launch pad with no damage. The Bat repeated it's performance using another B6-4 for the
second launch. This is an outstanding rocket, can't wait to try a C6-5 or CO-7 next flight.
Recovery:
I used the typical 1/8" elastic and attachment for this model. The length of the shock cord was about three
times the length of the rocket, or about 48". I chose to use a small 8" chute instead of the stock streamer.
No issues with recovery but on C6 motors your going to easily exceed 1000 feet so have some eyes ready.
Flight Rating: 5 out of 5
Summary:
This is a great rocket that offers something a little different with the unique fins. When you add the black color
scheme and the bat decals it's a very attractive rocket. However, looks aren't everything and this rocket is very
stable and can achieve respectable altitudes on a variety of motors. It's easy to build and would make a great addition
to anyone's fleet. Bottom line, down load the plans, order some decals and get cloning!
Overall Rating: 5 out of 5
 |
 |
Flights
Date | Flyer | Rocket | Altitude |
|---|---|---|---|
2009-11-01 | Mark Kulka | Estes The Bat (Clone) | - |
2009-07-11 | John Bergsmith | Estes The Bat | - |
Sponsored Ads
 |
 |


