| Construction Rating: | starstarstarstarstar_border |
| Flight Rating: | starstarstarstarstar |
| Overall Rating: | starstarstarstarstar |
| Manufacturer: | Quest  |

Brief:
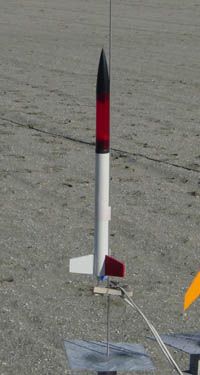
This is a skill level 1 single-stage rocket with a see through payload section. It is a basic three-fin/nose cone
design with the addition of a plastic bulkhead and a plastic forward payload bay. Through-the-wall fin attachment makes
this kit unique among kits this size.
Construction:
The parts list:
- 1 White body tube with three slots
- 1 Translucent red plastic payload section
- 1 Black plastic one-piece nosecone
- 1 Black plastic bulkhead
- 1 Kevlar® string 18in
- 1 Elastic shock cord 21in.
- 1 18mm motor mount tube
- 1 Engine block (thrust ring)
- 1 Engine hook
- 2 24mm-18mm centering rings
- 3 Laser cut 1/8in balsa fins with TTW tabs
- 1 14in mylar parachute (assembly required)
- 1 1/8in launch lug
- 1 Decal sheet
I built this kit simultaneously with my daughter and her friend. They were building them for their 6th grade science project and needed them to be as nearly identical as possible, so we did all of the steps together side by side. The instructions were very clear, and the girls had no problems following them. The illustrations were helpful. No special tools were needed.
Through-the-wall fin attachment took more than half the work out of getting the fins aligned. It is much easier when you only have to worry about making them perpendicular. The slots were just a tiny bit narrow. If you are not careful, you can collapse the body tube when you push the fins in. Sanding the fin tabs down a little solved this.
One thing the instructions did not address was the longitudinal location of the fins. The pre-cut fin slots are longer than the fin tabs, and the fins overhang the slot at the aft end. If you locate the fins at the back of the slot, they are perfectly flush with the end of the body tube, and that makes them look like they belong there. This leaves an open gap at the forward end of the fin slot, though. If the fin is pushed to the forward end of the slot, then the overhang covers the excess opening in the slot aft of the fin tab. This results in the fins not being flush at the end of the body tube, but I think it is better this way.
This rocket is extremely sturdy. The combination of 1/8in balsa and TTW fin construction make for a nearly indestructible rocket.
Finishing:
The white body tube made this very easy to paint since the recommended paint scheme was a white body. I sprayed the
body with white enamel, then masked off one fin and painted it red.(I didn't have orange.) I left the black nosecone
and coupler unpainted. Overall, it was easy to make this rocket look good.
Construction Rating: 4 out of 5
Flight:
The girls launched their rockets six times each in one day. All of the flights were made with Estes B6-4 motors.
There was very light variable wind. All of the flights were straight and consistent. The rockets made several flights
with different masses of payload (pennies) and measured the altitudes the old-fashioned way (trigonometry).
We used dog barf for wadding. A little blue tape was needed to cure loose nose cones and couplers. Flight turnaround was quick and easy.
I have also flown this with the PerfectFlite Alt15k altimeter. All that is needed is to drill a pressure-equalization hole in the plastic payload section and add a little padding. I used a piece of sponge.
Recovery:
The Kevlar®
portion of the shock cord is anchored to the motor mount centering ring. This keeps the inside of the body tube free of
obstructions to the deployment of the parachute. The elastic portion is packed above the wadding, so it is not damaged
during repeated flights. We had twelve flights in one day without damage to the shock cords.
The 14in parachute is just right until you get into heavier payloads. With a 30g payload (12 pennies), the rockets came down a little fast.
Flight Rating: 5 out of 5
Summary:
This is a great rocket kit. It is easy to build and it performs very well. It is great for science projects.
Overall Rating: 5 out of 5
Other Reviews
- Quest Payloader One By Steve Carr
Brief: This is a single stage, payload type rocket. A basic skill level one 3 fins and a nosecone kit. Construction: Parts list: White body tube with fin slots Motor clip Blue thrust ring Yellow motor mount tube Red centering rings(2) Plastic nose cone Clear plastic payload tube (mine was red) Tube coupler Launch lug 21 inch white elastic shock cord ...
 |
 |
Flights
 |
 |