Quest Evader Cruise Missile
Quest - Evader Cruise Missile {Kit} (2001) [1992-]
Contributed by Matthew Bond
| Construction Rating: | starstarstarstarstar_border |
| Flight Rating: | starstarstarstarstar_border |
| Overall Rating: | starstarstarstarstar_border |
| Manufacturer: | Quest  |
| Style: | Scale-like |

Brief:
My first true "Born Again Rocketeer" experience happened in the late 1990s when my son expressed an interest in the "real" rockets at the hobby shop. We built and flew many of the skill level one rockets around at the time, but I was somewhat disappointed in the lack of imagination that I saw in the mass market kits. (I guess the 1980's Estes catalogs are as good as it gets.) One company that had a few interesting designs was Quest Aerospace, and I was drawn to the Evader Cruise Missile with its unique looking nose cone and more odd shaped fins than any rocket could possibly need. There was also something about a Kevlar recovery system, and I couldn't imagine what you would use a bullet proof vest for in a model rocket. I bought one, built it and flew it a lot. Unfortunately, Quest stopped making it somewhere in the early 2000s, and after a long storied career, my Evader finally flew off into the sunset (or the trash can, I'm not sure which).
As I entered my latest chapter of "BAR"-hood I wondered if I could still find an Evader floating around somewhere. They would occasionally appear in an online auction but for the most part I came up empty. One fine day as I was checking out some more obscure online hobby stores I happened across one that claimed to have this fine kit in stock. I did not get real excited since I had run across this several times, only to find out that the store in question didn't actually have any left but just hadn't gotten around to updating their website (lame). Fortune was with me this time however, and soon I had a couple of Evader Cruise Missile kits in my hands!
Construction:
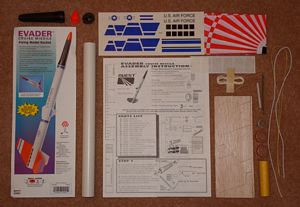
The Evader Cruise Missile comes packaged in a standard "hang tag" plastic bag with good quality components. Of note is the fact that this was the first rocket kit of any kind that I had encountered with Kevlar cord as part of the recovery system. I was pretty impressed by this at the time, and of course now I won't fly a rocket without it. The following items are included it the kit:

- T-25 Body Tube 12"
- BT-20 Motor Tube 2.75"
- Motor Hook
- 2 Centering Rings CR20/50
- Thrust Ring
- 3/32" Die Cut Balsa Fin Sheet
- Nose Cone Body
- Nose Cone Base
- Nose Cone Tip
- 1/8" x 2" Launch Lug
- Kevlar Shock Cord 12"
- Elastic Shock Cord 18"
- 12" Unassembled Parachute
- Shroud Lines
- Plastic "Gripper Tabs" for Shroud Line Attachment
- Self Adhesive Decal Sheets (Stickers)
- Instruction Sheet

Outside of the unusual fin configuration, construction of the Evader Cruise Missile is fairly standard with respect to model rockets. Quest rates this a skill level 2 rocket, which is probably fair, although I would put it about a 1.5. The instructions are printed over two pages front and back and are simple, effective, and well illustrated. The nose cone requires assembly with plastic cement, something not normally needed in model rocketry. The shoulder of the finished nose cone assembly is one of the shortest I have ever seen, only 1/4" long. Initially I had been worried that this would not be sufficient to keep the nose cone centered, but multiple flights have shown that it is more than sufficient for the job.
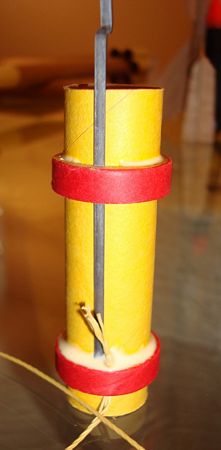
Motor mount assembly is next and is pretty standard. A slit is cut in the motor tube for the engine hook, and then the centering rings are glued in place 1/2" from each end of the motor tube. The supplied Kevlar cord is anchored under the forward centering ring by tying a knot in one end and then sliding the centering ring into place with the cord underneath and the knot behind. Finally the thrust ring is glued into the forward end of the motor tube. The instructions direct you to tie the elastic into the Kevlar cord at this point and then thread it through the body tube as you install the motor mount. Instead I just tucked the Kevlar cord back through the motor tube to keep it out of the way and waited until the rocket was finished to fish it back out. After applying glue fillets to all the motor mount centering rings, I swabbed a ring of glue inside the body tube and slid the motor mount into place with the end of the motor tube even with the end of the body tube. It is worth mentioning that the body tube is not actually a standard 24mm/BT-50 but rather a 25mm tube or T-25. The difference is just a few hundredths of an inch, not even discernible to the naked eye.
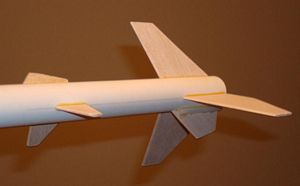
 Next the fins were separated from their balsa sheet and cleaned up with sandpaper. After some deliberation I also decided to round the leading and trailing edges of all the fins with the exception of what is called the "forward strake" which is really too small to benefit from any kind of shaping. A wraparound fin marking guide is included in the instructions. After marking the body tube, I used a section of small aluminum angle to extend the lines as required. There are 7 total fins on the Evader and 5 different fin shapes so you need to pay attention to which fin goes where and in what orientation. The aft fins are all placed even with the end of the body tube and the forward fins are all placed 6" from the aft end of the body tube. My normal routine for attaching fins is to set them in place with a double glue joint then add a second fillet of wood glue.
The launch lug is attached in a similar fashion at the aft end of the rocket against the lower tail fin. When I built my original Evader I didn't think twice about the position of the launch lug. After a couple of flights where the Evader did some serious "tail wagging" during boost, I began to wonder if this bird was susceptible to rod whip. In the end, it never seemed to affect the flight profile. The Evader always boosted straight even when it was wiggling, and once in a while it was entertaining so I left it alone when I built my latest version.
The last thing to take care of was to fish the Kevlar shock cord out of the body tube, tie the elastic shock cord to the Kevlar and to the nose cone, and put a drop of thin CA glue on all the knots.

Finishing:
Finishing the Evader per the cover art requires a little effort. My standard finishing routine starts with using Elmer's Wood Filler to get nice smooth fillets along the fin joints. Next I used 2 coats of SIG sanding sealer on the balsa fins followed by two coats of primer, sanding between coats. The entire rocket started out with two coats of gloss light gull gray. Finally, the two main "wings" and "rudder" were masked off and sprayed with gloss red. I have always had pretty good results using standard 3M masking tape for painting. As long as I always cut a fresh edge on a clean cutting surface and burnish the edges down prior to spraying the first coat, the final product is usually very clean. The final step in finishing the Evader involves adding the "self adhesive decals" or stickers to the rocket. As much as I hate putting stickers on my rockets, the details definitely add the right finishing touches for this bird. The stickers actually come as one large sheet, and the only complaint I have is that some of the stickers didn't line up right with the shape of the fins they were supposed to go on so I had to do a fair bit of "trimming to fit". Overall, it is worth the effort, and the Evader looks sharp when it's done.
Construction Rating: 4 out of 5
Flight:
The Evader Cruise Missile flies on the standard assortment of 18mm black powder motors. It would probably turn in a very impressive flight with an 18mm composite motor (RockSim puts it around 1700 feet), but so far I have not been brave enough to try it. I have flown various versions of this rocket dozens of times and it always performs well. The only off nominal characteristic that I've seen is the occasional tail waggle during boost. As I said before, the only reason I can come up with for this is the position of the launch lug. Since the lug is located at the tail end of the rocket, aft of both the CP and CG, my theory is that the rocket will get a little off line while it's traveling up the rod and get "flicked" as it comes off. No matter how it leaves the pad, however, the Evader always boosts straight and while it's not exactly slow, it isn't neck snapping fast either so it's always fun to watch.

Recovery:
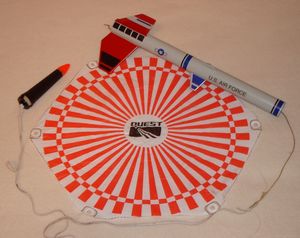
The kit comes with an unassembled 12" parachute. The chute material is a little bit stiffer than what I've come to expect from most of the other rocket companies (the header card calls it a "Tuff-Chute"), and once in a while, especially on cold days, it will have trouble getting fully deployed. The shroud lines are attached with plastic "gripper tabs", which remind me of the tabs used to hang small items in a store display. These are a little bulky, and as I discovered one winter day in Ohio, they do not adhere well in the cold. I eventually replaced the chute in my original Evader with an aftermarket Mylar unit. On my current bird, I modified the chute with circle reinforcement disks and tied through shroud lines. A 12" chute brings the Evader back for a nice easy touchdown, and I have flown it with a 9" chute on really windy days without any problems.
Flight Rating: 4 out of 5
Summary:
PROs: Unusual "Cruise Missile" style with multiple asymmetric fins and one of a kind nose cone.
CONs: None, except for the fact that you can't easily buy it anymore and it is almost impossible to clone due to the unique nose cone. I personally don't like stickers on my rockets, but that's not enough to affect my overall satisfaction with this bird.
Overall Rating: 4 out of 5
Other Reviews
- Quest Evader Cruise Missile By Chris Gonnerman (January 8, 2014)
Single stage missile-like rocket with an unusual compound nose cone. I picked this one up while passing through St. Louis; I had never seen one like it. Not surprising, I later learned, as I was able to find it in the early Quest catalogs on Ninfinger's site, but not on the current Quest website. When I discovered that it was both OOP and not reviewed on rocketreviews.com, I ...
 |
 |
Flights
Sponsored Ads
 |
 |


