| Construction Rating: | starstarstarstar_borderstar_border |
| Flight Rating: | starstarstarstarstar_border |
| Overall Rating: | starstarstarstarstar_border |
| Manufacturer: | Model Minutes  |
 Brief:
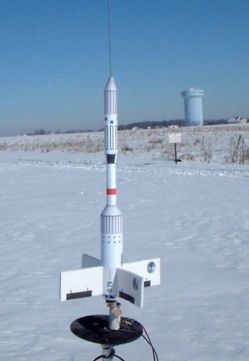
Want a cheap venture into space? Try this paper rocket complete with payload
bay. If you've never built a paper rocket though, this is not the kit to start
with as there are numerous intricate cuts and folds, 3 shrouds, and a paper
nose cone.
Construction:
Components are--paper! OK, the fins are actually cut from foam board, the
engine hook is metal, and there's a bit of clay nose weight, but everything
else is pre-printed highly quality color patterns to cut and fold. Recovery is
via a 9" mylar chute, with shroud lines that are terribly undersized (less
than 6"), and attached to a rubber band shock cord. I upgraded mine to
3/8" elastic from my spare parts box.
In order to take advantage of the very nice 3-D photos in the instructions, you must first build a pair of 3-D goggles (red film on one side, blue film on the other). I personally found this a bit hokey and the images aren't too clear under fluorescent light, but the photos are quite helpful, especially where I struggled to understand the instructions which had been translated from French.
Construction begins with a massive cut/form/glue festival, making the 3 body tubes, 3 shrouds, and nose cone. The main shroud is actually two separate inner/outer pieces bonded together for reinforcement. There are also a variety of rings that must be cut out of paper, bonded to foam, then cut out of the foam. My foam had been dented, most likely in storage, but it didn't look like it would jeopardize the flight. Make sure you have a very sharp knife for cutting the foam, as even my fairly new utility knife blade had a tendency to leave a slightly jagged edge to the foam. When I switched to an "extra sharp" X-Acto blade, I got very crisp, smooth edges. Also, white glue works best on the paper tubes and transitions, drying clear and leaving more of a "rolled" edge than yellow glue.
One tip on the main body tube: cut out the fin slots BEFORE rolling the tube rather than waiting until the directions call for this. You'll save yourself a lot of hassle, potential tearing, and get a much better finish.
The construction now moves to modular stages, adding centering rings/reinforcements to the body tubes. Clay weight is added to the nose, then sealed in by two pieces of foam block, which act as the nose cone shoulder.
The motor mount assembly consists of a rolled paper tube, engine hook, and foam centering rings. It glues into the bottom of the main body tube.
The body tubes and transitions are now glued together (separation is at the nose cone), and then the fins are attached. When they guys at the pad start making fun of you for flying a paper rocket, remind them that your paper rocket has through-the-wall fins! This is one durable paper tiger.
I completely upgraded the recovery. As noted earlier, the materials are a bit weak and the mounting is through a sliphole in one of the paper centering rings. I used a tri-fold mount and elastic, much like standard Estes kits. I also went with one of my spare 12" chutes with more generous 15" shroud lines.
Finishing:
As the patterns were all pre-printed, there's no finishing necessary for this.
The instructions suggest a Mud-pudge clear coat, which I've never heard of, so
I stuck with the untreated finish.
Construction Rating: 3 out of 5
Flight:
First flight was with no wind, freezing temps, and clear skies on an Estes
C6-5. The flight was perfectly straight, though spinning (probably due to the
bent foam fins). Very impressive for a paper rocket!
Deployment was a bit after apogee and resulted in a violent separation at the paper transition joint. Even on just this one flight there's evidence of burn marks on the inside.
Recovery:
As noted, the recovery provided for this rocket is weak and most builders will
want to upgrade it.
Flight Rating: 4 out of 5
Summary:
Very impressive design and appearance for a paper rocket. It will hold its own
against most commercial kits out there.
Overall Rating: 4 out of 5
 |
 |
Flights
Sponsored Ads
 |
 |


