Two-Stage Estes Fireflash Modification
Scratch - Fireflash 2-Stage {Modification}
Contributed by Niall Oswald
| Manufacturer: | Scratch |
 Brief:
Following a hard recovery (due to too long a delay on the motor) my Fireflash was looking a little worse for wear. As I was repairing it, I decided to make it into a two-stage, with a D12 as the first stage.
Modifications:
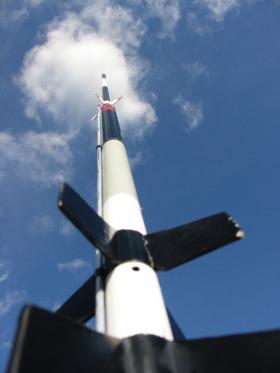
Since both BTs were crimped (this rocket has a BT-5 top and BT-50 lower section, I was doing the usual tube patching (i.e. cut the tube off and couple in a new section). The top section got an extension, since I removed about an inch of tube and added 8. I painted the extension (in the middle of the section) white, which (I think) adds to the ‘sounding rocket' look of the thing.
As I was sorting the lower section, which was crimped above the motor mount, it occurred to me that the section I had cut off (motor mount and fin can) looked like a booster section. I simply added vent holes and a coupler and I had an 18mm booster. This meant making a new sustainer motor mount and fins, which didn't take long — it's simply a copy of the section I cut off, again painted black and white. The rear CR is set far enough up the BT to allow coupling to the booster (it's a gap-stager), all pretty standard stuff.
 As I was doing this, I realized I could easily make a minimum diameter ‘D' booster, a la Commanche-3, and this would really get the thing moving :-). I wasn't sure launching this rocket in any wind on a C6-C6 combo was such a good idea (visions of horizontal flight). So again the original fins were copied in balsa and the (very simple) booster was made as before. All balsa fins were filleted with PVA (super PVA) glue, for a strong bond (I hoped) and the booster was sprayed as per the new MMT section of the sustainer.
I re-rigged recovery with a 12-inch clear plastic chute (home-made) and a 12-inch metallic mylar streamer for visibility. This turned out to be a very good idea! I had previously attached Kevlar® cord at each end of the shock cord (it looks virtually impossible to replace a broken Estes cord on this rocket) so I attached the chute to the top piece of Kevlar®, so that if the SC broke the (heavy) nose section would hopefully be recovered OK. It's very flimsy and full of noseweight — not a good combination.
 I think that's about the limit of the mods — I now had a bigger, better Fireflash, with the facility to fly 18mm to 18mm or 24mm to 18mm, meaning up to a medium E impulse. According to SpaceCAD, a D12-C6 flight would result in a flight to around 2350-feet — not bad I thought, considering the fairly mediocre performance of this rocket on C6s. Due to the heavy nose, the sustainer (according to the sim) should coast well, having been accelerated to around 150 ms by the booster.
I think that's the lot, the overall impression is of a ‘meaner' Fireflash, which looks more like a sounding rocket than the original, IMHO.
Construction:
- Two 80mm (or so) lengths of BT-50 (only one really needed).
- One 24mm motor block
- Two 24-18mm centering rings
- One 18mm Motor Tube
- I piece BT-50 coupler
- Balsa (3/32) for 8 fins
- About an 8-inch length of BT-05 for upper stage
Of course most of these were for repair - doing this from scratch would be easier.
If you've built any rockets before, this type of mod should be no problem. Aside from the usual fin alignment and finishing issues, there's not much to mess up here. Just make sure the stages fit together OK and remember to make vent holes in the gap! A failed staging is not pretty!
Flight:
At the October EARS launch, I flew this rocket twice, making four flights total (including the two before mods). This rocket seems very high maintenance - its quite delicate and the two-stage mod brings in new ways to damage itself :-)
 Flight 1) I loaded it “to the max” with a D12-0 and a C6-5 (it was rather windy so I thought a C6-7 wasn't a good idea). I don't suppose either flight hit 2350-feet due to the wind, but they certainly went a long way up for a model. I launched off a standard porta-pad, no problems here.. The first launch left the pad quickly and boosted into the wind, moving quite fast. The second stage lit fine and continued on up. I love the smoke trails you get from multi-stage models, and the Fireflash served up a treat.. However, the booster came in very fast — I was watching the top stage, but saw it briefly, coming in ballistic. It failed to tumble and went into the ground quite hard. The top stage made a nice line of tracking smoke before ejection, and something definitely deployed. The rocket came down fast, however, as the 'chute failed to deploy, getting jammed inside the plastic transition between the BT-50 and BT-5. Despite the weight of the rocket, it suffered only a broken fin (the streamer saved it) which was quickly repaired with CA.
Thankfully the tubes weren't crimped, so it was off to prep another flight.
Flight 2) The booster coupler had been damaged by its hard recovery, and was a very tight fit with the sustainer. I was a little concerned, but decided that it should blow off OK with the ignition of the top stage, all being well.
 The flight was much like the first flight from the ground — the D12 booster got the rocket going pretty fast, and the top stage definitely lit. I could see that the upper stage smoke trail wasnt even, but seemed to have bits coming out of it (if that makes sense - it was ‘ragged' rather than smooth) and no booster was seen coming in. The rocket coasted to apogee, and deployed both chute and streamer. The RSO said he suspected the booster hadn't separated, and inspection via binoculars as the rocket was descending revealed two sets of fins — not good news.
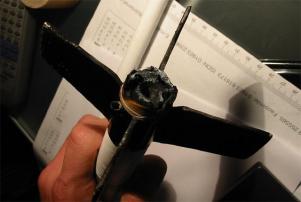
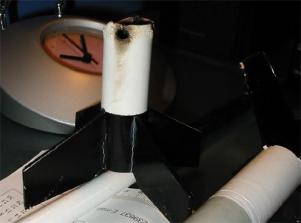
The rocket drifted a fair way, and when I got to it, the booster stage was about 10 feet from the main stage. It didn't look pretty! On closer inspection, it was clear what had gone wrong. The booster was burned right through (the vent holes were a little toasted after the first flight), with the paint blistered and impressive scorch marks below the vent holes. The remains of the coupler were still stuck into the top stage, and there was a lot of residue around the spent motor.
 Obviously the booster needs rebuilding, and I think more fins are in order, to hopefully promote a bit of tumbling. Smaller vent holes are also going to be made — 5mm is a little much, and seems to allow too much gas to escape.
Summary:
Pros: Looks nice in flight, cool smoke trails, flies very high
Cons: Torched the booster. However this should be easy to fix, requiring a new length of tubing only.
Other:
Tip: Don't make vent holes too large, and make sure the booster stage will separate. I think a tight fit is good, but with a shorter length of coupler in the future.
#Related Reviews
Related Products
 |
 |
Flights
 |
 |