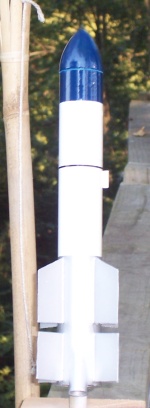
Scratch The ERINT Cluster Original Design / Scratch Built
Scratch - The ERINT Cluster {Scratch}
Contributed by Steve Carr
| Manufacturer: | Scratch |
Brief:
The ERINT Cluster is a scratchbuilt off scale of one of the Patriot family of
surface to air missiles. ERINT means Extended Range INTerceptor. The cluster
means it uses a 13mm Deuce type motor mount for propulsion.
Construction:
Parts list:
- 1 FlisKits EMK2-13-55c motor mount.
- 1 FlisKits NCB-55DW (This is a substitute. The one I used is homemade.)
- 9.5" length of BT-55.
- 1" length of 1/8" launch lug
- 18" length of 1/8" elastic for shock cord
- 1 12" plastic parachute
- 4 1"x4" strips of mat board or 1/16" balsa
This is a fairly easy rocket to build with a few tips used to make it better. Put together the motor mount as per the instructions that come with it and lay out the fins on the body tube for a four fin rocket with the wrap provided. Make sure the launch lug line goes up at least six inches. The fin lines should be at least four inches. Install the motor mount.
I like to lightly sand the body tube along the fin lines before installing. First cut a 1 3/8" piece from each piece of fin stock. Then cut a 2" piece from each. Take the 2" x 1" pieces and put a mark 1 1/2" from one end. Cut from the mark to the end. This will create the leading edge of the fins. For fin gluing, I used EMRR fin tip #9 and double glue jointed all of the fins.
Starting with the 1" x 1 3/8"piece, the 1 3/8" is the root edge. Hold these 1/8" up from the base of the rocket. The double glue joints of medium CA help very quickly. The forward fins are spaced 3/16" in front of the of the smaller fins with the 2" side being the root edge with the sweep going back.
With the CA dried, I always apply fin fillets as per EMRR fin tip (click here). The launch lug is cut into 2 equal pieces. One is placed 1/4" from the base and the other is placed at 6" from the base. No special reason for 2 lugs other than I just like 2 small lugs opposed to one lug in the middle.
Finishing:
I wiped down the rocket with a slightly damp cloth as recommended in EMRR
finish tip (click here). I like to use a white primer on all parts because it makes the
colors pop better and they seem to cover easier. The whole thing get a gloss
white base coat. Then I used a metal gray for the fin and bottom with a royal
blue for the top. These are the basic colors of the Army version, but not
really at true scale finish. I also added a black pin stripe just for fun.
Flight:
The parachute is attached to the body by the folded paper method with a small
screw eye into the nose cone. I attached the chute about 3 inches below the
nose cone.
If using a balsa nose cone, some weight might have to be added to the nose. Since I used poplar to make mine, it was plenty heavy enough.
The first flight took place at a QUARK launch in late September on a pair of A3-4Ts. With a generous amount of dog barf aboard I loaded her onto pad one. At ignition, both motors lit at the same time. Straight up with a little bit of arcing into the wind at the top. The 4 second delay was just right for this rocket.
Flight 2 was at a local ball field on a pair of 1/2A3-2Ts. Not very high but straight with deployment a little early.
Flights 3,4,and 5 were all with A10-3Ts. Not the best choice as the delay was a early but all flights had both motors ignite and recovered safely.
Summary:
This was a fun build. Nothing difficult and I like the FlisKits canted 13mm
Deuce style motor mount. This is definitely going to be a pull out at every
launch and fly rocket.
One con to the 13mm motors is the lack of choices. This is a one motor rocket. The A3-4T is the only choice.
Sponsored Ads
 |
 |


