| Manufacturer: | Scratch |
(Contributed - by John Coles)
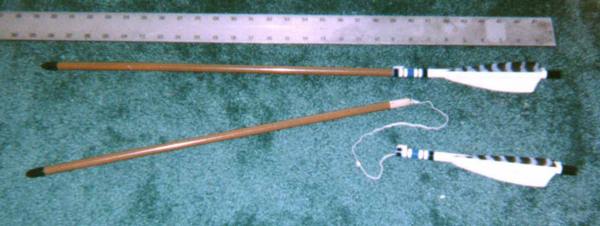
I'm a BAR with an affinity for oddrocs. While looking through the Apogee Components catalog one day, with their array of 10.5mm parts and motors, I thought about combining two of my favorite hobbies, rocketry and traditional archery. After all, arrows move at high speeds like rockets, are very stable like rockets should be, and are only lacking a self-contained propulsion source. So I decided "What the hey", generated a RockSim file to test my design and then placed my order.
This is the result.
Broken Arrow Break Apart Odd-Roc

 |
Length: 27.85" Main Airframe: BT-10.5 Parts List: |
 |
Most of the parts are finished separately before any assembly is done. The exception to this is in gluing the launch lugs to the 9" (short) body tube.
The first step is to fill the nose cone and body tube spirals with Elmerís Fill 'n' Finish (or whatever itís called these days), and sand them smooth.
Next, draw a line down the length of the short body tube. Glue one launch lug onto the line flush with the forward end of the tube, and the other lug onto the line 1 1/2" up from the other (aft) end. Verify that the two launch lugs are in alignment and allow to dry. Fillet the lugs and let dry again.
The nose cone is painted satin black, the 18" (long) body tube is painted brown, and the short body tube is painted gloss white with a .75" gloss black band on the aft end (the "nock"). The cresting on the arrow is accomplished using striping tape of various colors and widths, cut as necessary to fit around the forward launch lug. When the paint is completely dry, assembly may begin.
Apply wood glue 1 3/8" into the aft ("nock") end of the short body tube with a cotton swab. Using an Apogee micro motor or 3/8" dowel 1 1/2" long, push the engine block 1 3/8" into the body tube. The micro motor should extend 1/8" out the end of the body tube. Remove the motor, set the body tube up on the nock end and allow to dry.
Glue the nose cone into one end of the long body tube. Glue the coupler halfway (1") into the other end of the long body tube and set aside to dry.
Mark the short body tube at 120 degree intervals, such that one line is opposite the launch lugs. Attach the feathers, one at a time, to the body tube on these lines, using Duco cement or the equivalent. Place the back of the fins about 1/4" ahead of the "nock" line. You may find that clamping the feather with binder clips between two 6" steel rulers allows for easier handling. (I tried using my arrow fletching jig, but it can only handle up to 3/8" [9.5mm] shafts.) When dry, use the Duco cement to fillet the feather base to the body tube.

Fletch
Fin Template
3 ea. 5" shield-cut arrow fletching (from any sporting
goods store catering to traditional archers). Any standard 5" feathers
will work.
1/16" balsa fins may be substituted, but what's the point?
Set the screw eye into the exposed end of the balsa coupler, and secure with glue. Test fit the coupler into the forward end of the short body tube. The fit should be snug and smooth, not too tight or too sloppy.
Attach one end of the shock cord to the screw eye. Attach the free end of the shock cord at least 1" down into the short body tube, using either a small Estes-style mount or the method of your choice. The key is to make the shock cord mount unobtrusive enough so as to not interfere with deployment.
The final assembly step is to align the two sections of body tube. This minimizes corkscrewing during flight. Put the rocket together as if prepping for launch. Sight down the length of the arrow, and rotate the two sections of body tube relative to one another until they line up as straight as possible. Then mark the coupler at the point where it slides under the forward launch lug. That way, when prepping for flight you need only to line up the mark with the launch lug when putting the two pieces together to assure a straight flight.
Prepping for Flight
Insert two pea-sized balls of wadding into the lower body tube and puff down against the engine block. Accordion fold the shock cord and slide it in, then close up the two sections, making sure to line up the mark on the coupler with the forward launch lug.
Fit an Apogee 1/2A2-4 micro motor. WARNING! Use a wrap of tape around both the body tube and exposed motor to provide positive motor retention. (Black electricians tape preserves the look of the rocket - masking tape works, but doesnít look as pretty.) Failure to do so can result in kicking the engine and a lawn dart recovery (see flight report below).
Flight ReportThe Broken Arrow has flown twice, with one perfect flight and one recovery failure. The first flight went up straight as an arrow (but of course!), separated at apogee and recovered perfectly.
On the second flight, I failed to properly secure the motor, which ejected at apogee. With the CG shifted forward and the aerodynamics intact, she came zinging down from about 350' and stuck 1/2" into the sun-baked, drought-hardened dirt. Fortunately, it was far enough downrange that no one was ever in any danger. The body tube is kinked slightly just behind the nose cone, and will be easy enough to repair.
Sponsored Ads
 |
 |


