| Construction Rating: | starstarstarstarstar_border |
| Flight Rating: | starstarstarstarstar_border |
| Overall Rating: | starstarstarstarstar_border |
| Manufacturer: | Edmonds Aerospace |
Boost glider with radio control, designed for beginner RC fliers.
Rob Edmonds is renowned for his well-engineered, simple-to-build gliders. The Arcie II is Rob's attempt to move radio control from a specialty niche into the mainstream. The Arcie II is designed to be simple to build, easy to fly, and rugged enough to survive novice pilot errors.
The glider glides down under radio control, while the booster pod returns to the ground with its own parachute.
Kit Specifications
I couldn't find specifications in the manual or on Edmonds' web site, so these are the approximate values that I measured:
- Glider Length: ~21.25 in
- Wingspan: 18 in
- Fairing Diameter: 0.98 in
- Weight:
- Glider, raw parts: ~2.3 oz
- Glider, built, w/ RC gear: ~3.5 oz
- Full stack, no engine: ~5.0 oz
- Flight ready, D12 engine: ~6.5 oz
- Altitude: ~500 ft on D12, ~1000 feet on E9
- Recovery: R/C Glider
and 12 in (30 cm) Parachute - Recommended Engines:
D12-3, E9-4, C11-3
Background:
I have built several Edmonds kits (CiCi, Deltie Airshow, about a dozen Tinees), so I know what a great job Rob does designing gliders. I had no experience with RC flight, but I do know that novice RC pilots can quickly turn a beautiful plane into an expensive pile of balsa kindling. Rob's description of the Arcie II intrigued me and eased most of my concerns, so I asked my mother for this kit for my 40+th birthday. I usually don't ask for rockets as gifts because it gets too confusing for the buyer, but the Arcie II Purchasing Page was simple enough that Mom didn't have any problems placing the order.
The kit came from Balsa Machining Service packed in two triangular USPS Priority Mail tubes. One tube contained the Arcie II, the other tube was empty. It may be kind of surprising if you open the empty tube first, but the dual mailing tube did protect the parts from shipping damage.
Parts List:
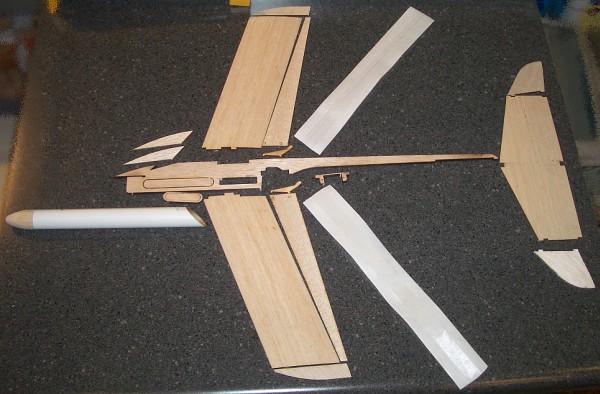
| Component | Material | Raw Weight |
| Fairing Nose Cone | BCN50J | 0.06 oz |
| Fairing Tube | BT50 ~8.5" , slotted | 0.17 oz |
| Fuselage | 1/4" balsa | 0.57 oz |
| Hook Holders (2) | Laser Cut Wood | 0.03 oz |
| Battery Holder | 1/4" balsa | |
| Wings (2) | Balsa, Pre-airfoiled, 3" chord,~3/16" thick |
0.86 oz |
| Winglets (2) | 3/32" balsa | 0.01 oz |
| Ailerons (2) | 1/16" dense balsa | 0.21 oz |
| Aileron Hinges (2+1 spare) | Strapping tape | 0.05 oz |
| Control Horns (2+1 spare) | Laser Cut Wood | 0.02 oz |
| Servo Mount | 1/4" balsa | 0.01 oz |
| Rear Stabilizer | 3/32" balsa | 0.20 oz |
| Vertical Tail Fins (2) | 3/32" balsa | 0.05 oz |
| Total Glider (No R/C Gear) |
2.24 oz |
Booster

| Component | Material | Raw Weight |
| Booster Tube | BT50 24" | 0.76 oz |
| Booster Nose Cone | Balsa BNC50K | 0.08 oz |
| Screw Eye | Metal | 0.09 oz |
| Shock Cord | 18" Elastic | 0.05 oz |
| Shock Cord Mount | Paper | 0.02 oz |
| Parachute Kit | 12-inch Plastic | 0.40 oz |
| Launch Lug | 3/16" x 2" | 0.01 oz |
| Booster Hook | Laser-cut 1/4" Plywood | 0.14 oz |
| Total Booster | 1.55 oz |
- Hitec Feather Receiver with crystal
- Hitec HS-55 Servo
- Battery Pack (50 mAh 4-cell NiCd pack recommended)
Instructions:
The instructions are printed on ten 8.5x11-inch pages, with plenty of computer-generated illustrations. The directions are written in a friendly conversational tone. It's almost like having Rob leaning over your shoulder explaining everything.
CONSTRUCTION:
The main wing is a solid slab of balsa that has an airfoil cross-section. The first step in the instructions calls for beveling the tailing edge of the main wing to a sharp 45-degree edge. This sharp edge is critical, as it allows the ailerons to pivot freely. After that, any roughness in the wings can be lightly sanded smooth.
In contrast to what the directions say, I would recommend doing the sanding before the beveling, since the sharp edge could be easily dinged during the sanding process if done in the recommended order.

The next step calls for the wing sections to be glued together with a 3/4-inch dihedral. I found that a spent 18mm engine works well for setting the dihedral. I used Tightbond II wood glue.
I tried to get fancy by beveling the tabs where the wings joined together, thinking I could achieve a better joint. I shouldn't have bothered. The tabs fit better before I started messing with them and just required extra glue to fill in the gaps I created.

The black diamonds near the wing roots are important. They are used to set the balance point of the glider once it is fully assembled. They are lightly marked on the surface by a laser. Be careful not to remove them when sanding the wing.
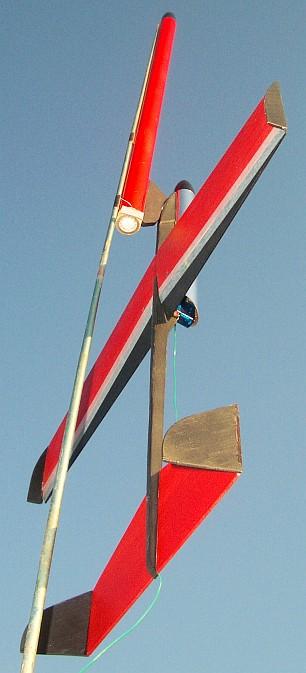
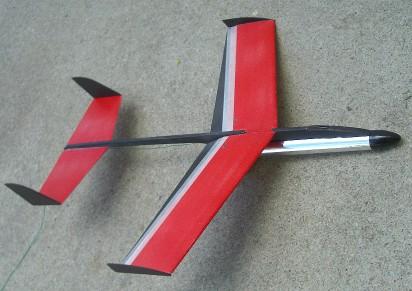
At this point, I took a detour in the build process and painted the parts, after first masking off all the areas that would need to be glued later. After the paint dried, the winglets were glued to the wings.
The ailerons were then attached to the the trailing edge of the wings using strapping tape as the hinge material. A small amount of trimming may be necessary to ensure that the ailerons do not rub against the winglets over their range of motion. The control horns are glued to notches cut from the aileron.
The rest of the glider goes together like most of Edmond's other gliders. The horizontal stabilizer, vertical stabilizer, boost hook holders, and main wing assembly are glued to the fuselage.
Next comes the installation of the radio gear. I used the recommended Hitec Feather receiver and the Hitec HS-55 servo. The receiver fits into a slot in the fuselage after just enough light sanding to maintain a snug fit.
I ran into one of the few difficulties of the build process while mounting the servo. The mounting screws caused splits on both ends of the servo mount bracket, despite first using a fine drill bit to enlarge and clear the pre-cut screw holes. I believe the mount bracket should have been made from plywood or hardboard instead of balsa to prevent splitting.
The battery pack is supposed to mount in an oval battery holder, which can then be positioned in the front slot to adjust the balance point. I did not use the recommended Sanyo 50mAh rechargeable battery pack. Instead I used a 4LR44 alkaline 6V battery (Radio Shack #23-469) mounted in an N-size battery holder (Radio Shack #270-405). This battery is a little wider than an N battery, so the edges of the holder had to be trimmed to fit. A wrap of masking tape held the battery securely in the holder. This battery weighs about 7g less than the rechargeable pack, which mostly makes up for the additional weight of the paint I used.
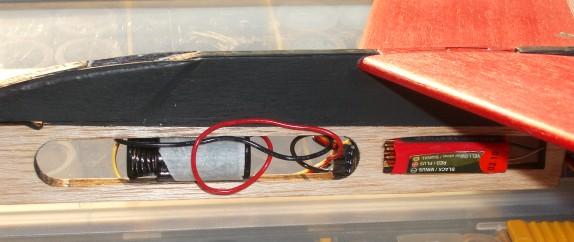
The final steps in the glider assembly process are to route the antenna along the fuselage, slide the fairing into place, and adjust the balance. The battery is moved in the slot to acheive the desired balance point, which is inside the diamonds printed on the tops of the wings.
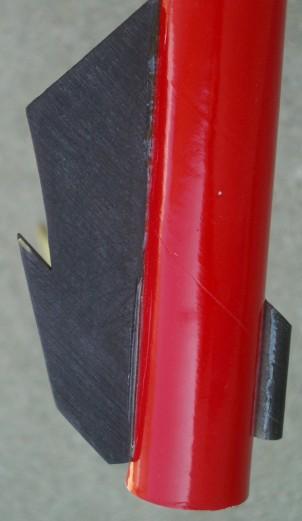
Helpful Hint: Before gluing the fairing cone to the fairing tube, test-fit it. The shoulder length on the cone may be too long, preventing the fairing from sliding far enough rearward. If so, trim the shoulder until the slot in the fairing ALMOST touches the bottom of the slot in the fuselage. Don't trim too far, or the fairing tube will be vulnerable to splitting during hard landings.
The booster is dirt-simple: A long tube with a nose cone, launch lug, parachute, shock cord, and the booster hook. The booster hook is supposed to be mounted flush with the bottom of the tube. I sanded off about 1/4-inch from the rear of the hook so that I would have a better surface to use for taping the engine in place.
Finishing:
Normally I use magic marker to color my gliders to save weight, but there is so much lumber here I didn't want to mess with the markers, plus I wanted a finish that would protect the wood from moisture. Paint adds weight in a hurry, so it must be used sparingly in gliders. For this reason, I made no attempt to fill the grain or make the wings glassy smooth using sealer or primer.
After using 1/4-inch masking tape to protect all the spots that would be glued later, I sprayed a VERY light coat of gloss red on the wing and horizontal stabilizer, and a thicker coat on the booster tube. After the paint dried, I lightly sanded the wing to remove any excess paint. The fuselage, ailerons, stabilizers, and winglets received a coat of flat black. The nose cones were both coated with thin CA, sanded smooth, then painted with gloss black.

There are a few places that MUST NOT be painted, since the paint could interfere with proper operation during flight. The first place is the booster hook and the notch on the fuselage where it attaches. The other place is the control horns, which rub against the servo output arm. For these critical places, I used black Sharpie marker.
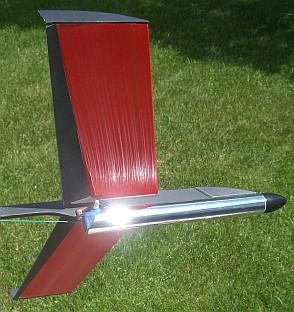
After taking the picture above, I wrapped the fair tube with chrome Trim Monokote. This stuff has a beautiful mirror finish, but should be limited to small areas to keep the weight down.
Weight
I weighed each of the key components at various points in the build process. The biggest weight change occurred on the wings: 0.86 oz raw, down to 0.79 oz after sanding, then up to 0.90 oz after painting. The MonoKote on the fairing tube added 0.04 oz, from 0.17 oz to 0.21oz.
My flight-ready glider weighs 3.44 oz, even with the paint and MonoKote. Based on comments of others on The Rocketry Forum, that's pretty good.
| Component | Raw | Finished |
| Fuselage | 0.57 oz | |
| Wings | 0.86 oz | 0.90 oz |
| Ailerons | 0.21 oz | |
| Stabilizer | 0.20 oz | 0.21 oz |
| Fairing Cone | 0.06 oz | 0.07 oz |
| Fairing Tube | 0.17 oz | 0.21 oz |
| Other Parts | 0.17 oz | |
| Total Glider (No R/C Gear) |
2.24 oz | 2.45 oz |
| Flight-Ready Glider (with battery, receiver, & servo) |
3.44 oz | |
| Total Booster | 1.55 oz | 1.58 oz |
| Total Stack (no engine) | 5.02 oz | |
| Takeoff Weight (D12-3) | 6.51 oz |
Construction Rating: 4.5 out of 5
FLIGHT/RECOVERY:
Balance and Trim:
Unlike most gliders, the Arcie II should NOT be hand-tossed for trimming. Once the balance point is inside the diamonds, the glider is good to go.
Flight Preparation: Here are the steps for flight preparation:
- Insert wadding and parachute into booster tube as you would in a normal rocket.
- Insert motor into bottom of booster tube and secure it with a band of masking tape.
- Install the igniter.
- Slide the glider fairing forward to expose the electronics.
- Connect the battery to the receiver.
- Turn on the transmitter. Wiggle the stick and verify that the ailerons move freely. Adjust the transmitter trim to give equal deflection to both ailerons.
- Slide the fairing back to cover the electronics.
- Put the booster on the launch rod. Use a long rod with a standoff (like a clothes pin) to keep the glider away from the blast deflector.
- Attach the glider to the booster.
- Connect the igniter leads. Make sure that after ignition the leads cannot snag on the glider tail or the antenna.
Travel Limits: When the servo is at its extreme position (which can happen with a combination of full stick deflection and some trim adjustment), it is possible for the servo arm to move beyond the end of the control horns and jam there. This will probably lead to a death spiral, and is to be avoided. To prevent this from happening, some transmitters have an ATV adjustment to limit the maximum deflection. For transmitters without ATV adjustment, avoid using a combination of full stick deflection with a large amount of trim.
Test Flights:
Edmonds recommends the D12-3 for first flight, and I absolutely agree with him. All three of my flights on a D12-3 have been fantastic. Good acceleration off the pad, long boosts with little or no arcing, and ejection at just the right point in the flight. Ejection is a bit scary as the glider comes zooming out of the maelstrom of ejection smoke and debris before settling into a smooth glide. After that, the real fun begins.
Flight 1: Glider did a quick loop, then several tight turns. I suspect that one of the ailerons was stuck and this was the beginning of a death spiral. However, a few quick taps on the RC control unstuck it, resulting in a gorgeous glide. I flew a few figure-8's before skidding to a perfect landing about 40 feet from the pad. Duration: 1:35
Flight 2: R/C glider flight was FANTASTIC. While flying into the wind, the forward airspeed almost exactly matched the wind speed so the glider appeared to hang in mid-air. After several smooth turns, I brought the glider to a landing about 15 feet from me. Duration: 2:09.
Flight 3: Glider flight was another stunner, passing within 8 feet of videographer and missing range box by about 3 feet. Duration 1:51.
Booster: As enthusiastic as I am about the glider performance, I must give poor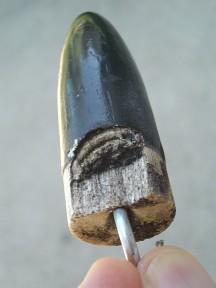 marks to the booster recovery. All three of my flights resulted in partial malfunction of the recovery system.
Flight 1: The motor kicked out at ejection. This made the booster much lighter so it drifted a long way. >Also, the short shock cord snapped back into the booster tube, resulting in a ding in the tube and a sizeable chunk of the nose cone base torn away. After landing, the screw eye pulled free of the nose cone while I was examining it. I'm just lucky it didn't fall off in mid-air.
Flight 2: At ejection, the shock cord snapped in the middle. The nose cone and parachute drifted to the far side of the field, while the booster free-fell tail-first. Fortunately, it landed on soft grass and the engine case took the brunt of the impact.
Flight 3: I tied the shock cord back together. It survived ejection, but 6 of the 8 shroud lines snapped from the chute. Again, the booster landed on grass so no damage was done.
The motor kick-out on flight 1 could have been prevented by using a motor hook. I don't know the best way to correct the other recovery problems, though. A short elastic shock cord is very likely to bounce back at the end of its travel. Here are some options, with their pros and cons:
- Make the shock cord longer.
+ Less likely to snap the cord
+ Less likely to bounce back into booster
- Increases the chance that it will get tangled with the glider, which would be a bad thing. - Switch from elastic to Kevlar.
+ No bounce-back into booster.
- Hard jerk and thin line is likely to zipper the booster tube. - Use a streamer instead of parachute.
+ Reduces the jerk when the chute opens
+ No chance of tearing shrouds
+ Fast yet safe descent so less drift.
+ Makes the booster easier to find.
- Streamer could tangle with glider. - Add additional fins to the rear of the booster so that it glides tail-first like some SuperRocs (I got this idea from the Alway brothers and VJP on The Rocketry Forum). Possibly omit the chute.
+ Less chance of tangling with glider.
+ Less chance of tearing the shock cord.
- Faster landing speed. - Attach a Kevlar shock cord to the base of the booster hook and run it to the nose cone along the outside of the tube. Edmonds uses this attachment method on the booster for the Deltie Airshow.
+ No chance of bounce-back
+ No chance of Kevlar zippering the tube
- Might jerk the booster hook loose.
- Cord might get tangled with glider.
I'm not sure which of these techniques is best, but I'm considering trying the last one.
Glider Flight Rating: 5++ out of 5
Booster Flight Rating: 3 out of 5
Overall Flight Rating: 4.5
SUMMARY:
Rob Edmonds has succeeded in his mission to make an R/C glider that is affordable, easy to build, and easy to fly. This is a fun kit to fly.
PROS:
- Radio Control is wicked cool!
- Innovative single-channel R/C design
- Easy for beginners to fly
- Well-engineered laser-cut components
- Clear instructions
CONS:
- No motor hook
- Servo mounting bracket splits easily
- Booster recovery system is failure-prone.
Overall Rating: 4.5 out of 5
Other Reviews
- Edmonds Aerospace Arcie II By Michael Rangitsch
Picture courtesy of Edmonds Brief: Rob Edmonds Radio Controlled 24mm Boost Glider Construction: Standard boost glider configuration with R/C battery, receiver, and HiTec servo. The glider is balsa with a few hardwood components. Boost module is a long section of BT50, recovered on a 12 inch parachute. Both nose cones are turned balsa. ...
 |
 |
Flights
 |
 |
Sponsored Ads
 |
 |


V.J.P. (September 14, 2004)