| Construction Rating: | starstarstarstarstar |
| Flight Rating: | starstarstarstarstar |
| Overall Rating: | starstarstarstarstar |
| Manufacturer: | FlisKits  |
Brief:
I was at a two day Launch in Whitakers, NC where I had the pleasure of visiting
a newer manufacturer who had a booth set up on site. FlisKits had come to the
launch and boasted a professional display of their line, to include kits, parts
and supplies for the fliers at the meet. It is there I got to meet one of the
owners, Jim Flis, and that's when the Overdrive caught my eye. I had other
purchases that weekend, including the FlisKits Cougar 660, but this smaller
model was just too cool looking to pass up. The FlisKits 'OverDrive' is a 13mm
Futuristic style model with a very slick and unusual fin configuration. My kit
was serial #49 and was rated as a Skill Level 1 model, even though fins needed
to be cut and assembled. I gave the kit to my son as a gift from the launch and
we both were anxious to get started.
Construction:
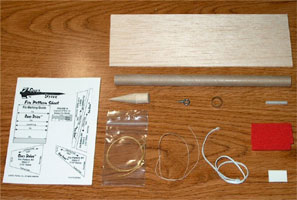
The kit came packaged in a bag and all parts were present.
The Kit inluded:
- A Balsa Nosecone
- Kevlar® Shockcord ( a very nice touch )
- Elastic Shockcord
- Streamer
- Motor Mount assembly
- Fin stock hardware and
- Well illustrated instructions
The Fin templates and marking guides came on typical cardstock and the wraps had that 'perfect' fit I have grown accustomed to with FlisKits. We assembled the motor mount, which uses friction fit for retention, then moved our way to the fins.
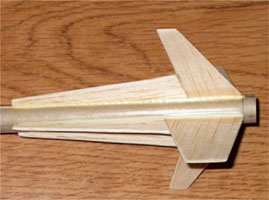
Most of the time during construction was spent on the fins. You need to cut them out using templates, easy enough, and then they need to be assembled before mounting. I used the bag the kit came in as a table covering, then used CA to glue each fin half together. Once all four fins were made, I beveled the leading and side edges, then soaked both sides of each fin in thin CA. They were pressed down flat against the table with soaked side down until dried, then I flipped them over and did the other side. This hardened the fin and I 'plastic-coated' them after some sanding. Once each fin was completed, they were installed on the bodytube using Alphaetic Resin. The nosecone was also drenched in thin CA from the shoulder forward, then sanded to a plastic feel.
An 'eye' hook is provided for the nosecone, which was installed and the shock cord tied to the hook. The shock cord for this model was a bit unusual, as it is mounted by hooking about 1" around the bottom joint of a fin, then bringing it up the other side of a fin where the fillet would reside. I did this, then applied resin fillets to all the fin joints. Finally, my son finished the streamer assembly and we attached it to the model.
Finishing:
Finishing was done using Krylon Primers and Paint. The entire model was sanded,
then tac ragged and was ready for primer. A few coats of white and gray mixed
were applied, and pretty much made the Kevlar®
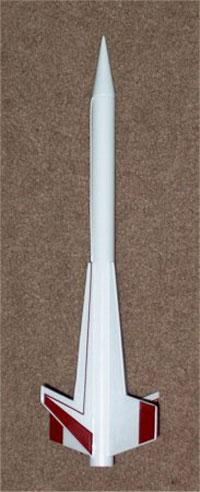
disappear at the fin joint. My son wanted it done in stock colors, which is
White with Red decals, so we painted it using Krylon Glossy White. I made the
decals from Monokote trim, then we applied them to the model. It looks very
similar to the front card insert that comes with the kit, with a slight twist.
The results were very satisfying as the model appears to be almost made from
plastic with no seams showing.
Construction Rating: 5 out of 5
Flight:
The day came to fly the Overdrive , so we took off to the field with equipment
in hand. The model was prepped with an Estes 1/4A3-3 motor for the first flight
and was friction fit to the model. Since this was a minimum diameter model and
there was enough motor sticking out of the rear, we used the 'Deuces Wild'
method of retainment, taping the motor to the outside lower body tube for
additional security. Tissue was inserted into the BT and the streamer was
installed, then the model was placed on the pad. When the button was pushed, it
took off like a dart, even on the smaller motor!!! What a flight, very fast,
yet visible to apogee.
Recovery:
Ejection happened at apogee and the bright red streamer made it easy to track
the rocket. It landed very close to the pad and was quickly prepped and
launched again. As we still had many other new rockets to fly, we limited it to
two launches. I must say for a smaller kit, the performance was very good.
Flight Rating: 5 out of 5
Summary:
In summary, the FlisKits Overdrive is very slick model made from some of the
highest quality parts available, making it a real pleasure to build and fly. My
son is very happy with how the model turned out as am I, and we look forward to
many more launches with it. I recommend this kit to anyone that wants a
slightly challenging build and a good flying sport rocket.
Overall Rating: 5 out of 5
Other Reviews
- FlisKits Overdrive By Russ Anthony
( Contributed - by Russ Anthony - 10/01/03) Brief: This is a 4 fin, futuristic, lightweight 10" rocket with streamer recovery and high quality components. The packaging is very attractive, professional and colorful as per FlisKit standards. An individual production number is provided for the first 100 kits, mine is #29. Although advertised as skill level 1, eight fin parts must be ...
 |
 |
Flights
Date | Flyer | Rocket | Altitude |
|---|---|---|---|
 |
 |
CLS (November 22, 2004)
Sponsored Ads
 |
 |


J.F. (April 29, 2004)