Scratch Convertible Original Design / Scratch Built
Scratch - Convertible {Scratch}
Contributed by John Chapman
| Manufacturer: | Scratch |

Brief:
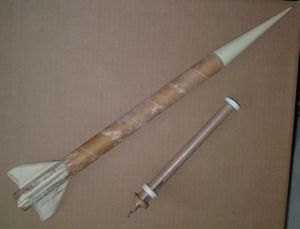
This rocket is easily convertible from a 29mm Mach buster with a silly altitude
capability to a 250 foot schoolyard rocket. The heart of the concept is the
full length removable "stuffer tube" assembly held in place with a
small piece of tape.
Construction:
The 15 inch long PML phenolic body tube is topped with the solid urethane nose
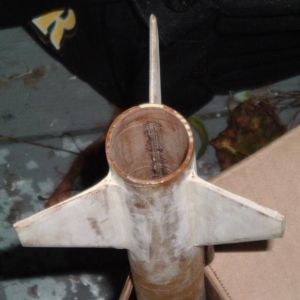
cone and a 14 inch nylon chute. The fins feature "sort of" TTW
construction with fiberglass cloth reinforcement across the base of each fin.
the shock cord is anchored to a hand twisted two strand 200lb Kevlar®
shock cord hooked to a three foot length of elastic.
The adaptor, pictured in the photos, is slid into the back for small field cheap flying with C engines with a 3 second delay. An adaptor for 24mm engines would be easy enough to use by using the same technique.

After my successful but tree eaten "Transonic", I had the phenolic TTW slot cutting technique down. I read in the EMRR tips of the "two parallel cutter wheel" technique for the Dremel. It worked like a charm.
The tail fins were cut out of 3/32 ply and gang sanded to uniform pattern. I sanded the leading and trailing edges into a sharp wedge using a belt sander.
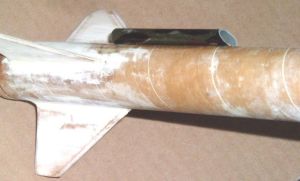
To glue the fins in place, I first inserted a plastic covered 29mm RMS engine to act as a depth guide. Each fin was cemented with 5 minute epoxy. Afterward, I used light fiberglass cloth to reinforce the base of each fin. Elmer's Fill 'n' Finish smoothed the spiral groove and made a nice fillet at the base of each fin. Then, I sanded the inside of the tube so that the engine could be easily inserted and removed.
Rather than wait for 300 lb Kevlar® to arrive, I simply twisted two 100 lb Kevlar® cords like one would twist rope. I used the forward 29mm centering ring/engine block to hold it in place.
Next I constructed the adaptor. I used 29mm centering rings to hold the standard 18mm body tube in the correct location. I used a 1/4 inch ring of phenolic to provide a taping surface. The Estes engine hook was glued in with a slot to aid flexing.
 For a 1/4
inch launch lug, I cut an aluminum arrow shaft and angled the leading edge. I
tacked it into place with CA and filleted it into place with epoxy.
Flight:
The first flights used the C engine alternative only. I will need to use the
"frozen lake" alternative this winter to use the G that will make
this reach Mach and over one mile altitude. I deliberately left sufficient
space so that an H can be used for a truly absurd shot.
The schoolyard shots were fun. I flew it along with a Quest saucer to entertain my Cub Scouts during downtime at a rocket event.
I launched it off a 3/16" launch rod and noticed the characteristic early, slow wobble until it straightened out. The adaptor concentrated the ejection in very positive fashion, and the rocket ejected right at apogee with a 3 second delay, just as RockSim said it would. This was a hoot for the cubs and parents since their Novias, with very light construction, ejected so high that the process couldn't be seen. The landing was eventful only because the rocket missed a tree by about a foot on the first launch.
Obviously, an 18mm D RMS option is quite feasible for intermediate sized fields. Since I have one, I didn't bother building a 24mm adaptor.
My Cub Scouts were interested to see how much less altitude this bird got than their Quest Novias with only A engines. It was a good opportunity for a brief lesson on thrust and mass. The nose cone alone probably weighs more than the Novia with engine!
Summary:
PROs: Fun to build, easy to fly with cheap engines, yet you can get about as
much performance as you can stand with this in 29mm mode. Very tough! The
adaptor works much better than the short adaptor I used on the similarly
constructed "Transonic".
CONs: Not for novices to build, though they could fly it easily. Due to nose and airframe weight, a ballistic return would be a white knuckle affair over persons or property from significant altitude.
At the extremes of altitude, I may wish I had used an electronic recovery actuator.
Sponsored Ads
 |
 |


