Scratch The Amazing Underperforming Mono-Nano-Copter Original Design / Scratch Built
Scratch - The Amazing Underperforming Mono-Nano-Copter {Scratch}
Contributed by Dick Stafford
| Manufacturer: | Scratch |
Brief:
This prototype was my first attempt at building a monocopter. It is powered by
Micro-Maxx motors and is truly underpowered. The MMX motors have too short of a
burn to be a good choice for a monocopter, even if it is "nano"
sized. Not too impressive by most standards. Well, one man's curiosity is
another man's triumph (or something like that).
Construction:
Parts required:
- 1/4" balsa, 1" x 1"
- 1/16" balsa, 1 3/8" x 4"
- Ink tube from a Bic pen
- One sheet of drafting vellum (any paper will probably do)
- 1/16" x 12" aluminum tube
- 1/4" x 1" dowel
- Masking tape
- Lead for nose weight (see assy instructions)
- Carpenter's glue
- Black, CA (I can't remember the actual name)
- Thin, CA
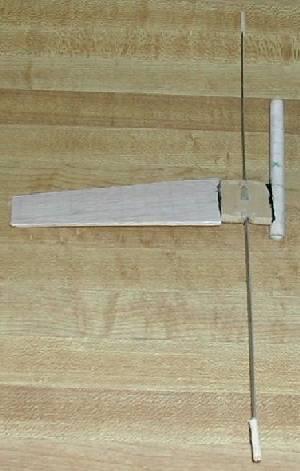
The central hub is a 1" square of 1/4" balsa, soaked in thin CA. I carefully drilled a hole in the center to hold the launch lug. This is, hopefully, the point about which the monocopter will spin. I also drilled holes in the middle of each side to mount the balance beams. I used pieces of the ink tube from a Bic pen for both the launch lug and the mounting points for the beams.
The single wing is a clipped delta with the following dimensions: root - 1 3/8", tip - 7/8", span - 4". It is balsa strengthened with drafting vellum and ProBond glue. I wanted to add a bit of strength and had never tried vellum before. I spread a thin layer of glue on each side, placed the wing between a folded sheet of vellum, and compressed it with a stack of books. The wing seems strong enough, but the surface is not as uniform as I would have liked. I attached the wing at an angle of about 10 degrees from the monocopter's X-Y plane using black Bob Smith CA. It is mounted such that the swept face is on the trailing edge and the leading edge is raised. I oriented the swept face on the trailing edge to allow me to more easily position the CP of the pod behind this edge (a tip I got from the book "Monocopters", by Francis Graham).
The motor pod is the length of three MMX-II motors and was scratch built from drafting vellum (someday I'll actually buy some MMX tubing). It is both light and strong. The cone was turned from a dowel. It turns out that the motor pod must be angle upward to counteract the torque caused by the single wing. Some of Francis Graham's designs have their pods angled at up to 40 degrees. However, I chose the start with an angle of 30 degrees (in the opposite direction from the wing). To get the CP behind the trailing edge of the fin, I added several #7.5 lead shot to its nose. I should have counted the shot, but forgot to. The CG is at the little green 'x' that's barely visible on the photo. This 'x' is positioned approximately at the trailing edge of the wing's root, and since the wing is swept in the opposite direction, it is behind the trailing edge of the rest of the wing.
I had wanted to use some light 0.03" carbon rods for the balance
beams, but didn't find any at my favorite hobby shop. Instead, I used a
12" long, 1/16" diameter aluminum tube. This was cut in half and
CA'ed into the ink tubing that was previously mounted in the hub. I didn't add
much ballast at the ends of these beams, wrapping about 1 1/2" of masking
tape (very high tech) around each end.
Flight:
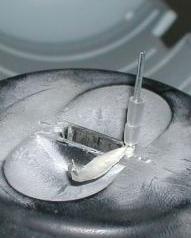
The second photo shows the MMX launch pad with its special launch 'rod'. The
rod is a piece of a heavy paper clip. It wasn't the right size so some masking
tape was used to hold it tight. A piece of ink tube was used as a standoff to
keep the monocopter from hitting the MMX launcher and to help it spin.
I used MMX-II motors, Estes igniters, and my Pratt GO-Box for ignition duties. The monocopter did fly. On its 1st flight, it rose to a whopping two feet, at an angle of about 30 degrees from the vertical, before the motor ejected and stopped the spin abruptly. I should have removed the ejection charge! Still, it didn't just flop around. I never expected much performance so I think it was a good first try!
On its second flight, all conditions were the same except I removed the ejection charge from the Micro-Maxx motor. This time, the monocopter barely cleared the launch rod. I think that the igniter may have hung up ever so slightly. With so little upwards thrust, it wouldn't take much to affect its flight.
Flights three and four were similar. For these flights, I bent the igniters, carefully fit them it into the nozzle, and arranged the clips so they held it in place without any tape. Both times the monocopter rose to about a foot and went off sideways at a steep angle. It landed maybe 4 - 5 feet from the pad. This seemed lower than the first flight but definitely higher than the second did!
Summary:
In summary, I consider this experiment a complete success. The performance was
poor, but I didn't have any expectations in this regard. When I decided to
build it, I wasn't at all sure it would even take off or be stable. The Amazing
Under-performing Mono-Nano-Copter met both of these criteria. My next try may
be a lighter
MMX-powered
monocopter, but then, I have these long-burn, OOP Apogee B2 motors...
 UPDATE 10/02:Sitting at the computer, and in between steps of
other projects, I decided to revise The Amazing Underperforming
Mono-Nano-Copter. It isn't so underperforming any more!
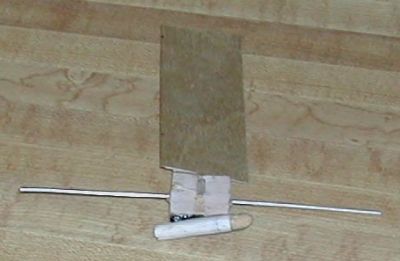
I cut down the motor pod to an inch and a quarter, just enough to fit the dowel nose cone and a MMX motor. The business about having the CG behind the trailing edge of the blade is not a requirement as I've later found. I cut the old wing to about 1/4", and added a 4" x 1 1/2" piece of 1/64" Birch. I have also determined that the balance beams were way too long so I cut them to 2 1/2".
The first two flights went to about 9 feet and landed 3 and 5 feet from the pad, respectively. On the third flight, it headed off at a 45-degree angle, smacked the side of my SUV, and still rose to about 7 feet. Much better performance than before!
The main lesson-learned is: build 'em light!
Sponsored Ads
 |
 |


