| Construction Rating: | starstarstarstarstar |
| Flight Rating: | starstarstarstarstar |
| Overall Rating: | starstarstarstarstar |
| Manufacturer: | FlisKits  |

Brief:
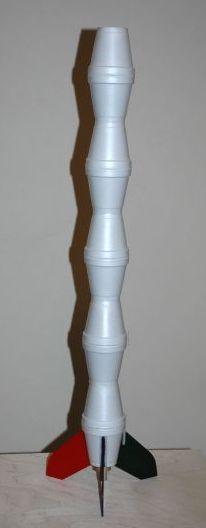
The face card of this unique kit from FlisKits claims to be "The ultimate
13mm caffeine machine". The Espresso is also the 2005 National Sport
Launch anniversary kit. It uses 4 ounce coffee cups for construction and is
quite a bit smaller then its big brother, the Decaffeinator, but definitely is
not small on performance.
Construction:
The kit includes:
- 1 9" body tube
- 1 8" body tube
- 1 nose block
- 2 3/32" fin stock
- 2 centering rings
- 1 2" launch lug
- 1 1" launch lug
- 1 engine block
- 1 crepe streamer
- 1 elastic shock cord
- 1 Kevlar® shock cord
- 10 4 oz foam cups
- 1 fin pattern sheet
- 1 hints and tips sheet
- 1 set of instructions
Construction is quite similar to the Decaffeinator. You start by gluing in the engine block and then gluing on the fiber centering rings to the motor mount tube. The elastic shock cord is attached under the top ring and the Kevlar® shock cord is attached to the main body tube using the nose block. The two cords are then tied together. Those cords are not going anywhere! The streamer is attached directly to the motor mount tube versus to the shock cords which deviates from other rockets I have built.
There is a template included for the base of the cups so you can cut out holes in three of the cups to allow insertion of the body tube. I cut out the template right on the black line, but it was too large to fit inside the rim of the cups. I had to trim it twice very carefully to get it to fit. Once I was able to use the template, I traced the center hole on three cups and cut out the hole very carefully with a sharp X-Acto knife. Go slowly and use a sharp knife on this step as the foam can break quite easily.
You then glue two of the modified cups together by their rims using hot glue. Be careful to not allow the tip of the glue gun touch the foam for it will melt the cup. You have to work pretty quickly with the hot glue as it sets up fast. Once joined, you insert the main body tube through the holes in the cups and hot glue the tube into place. Since I already had the glue heated up, I proceeded to glue the remaining cups together for the upper part of the rocket.
You then attach a fin marking guide around the first cup and mark where the cuts for the fins will be. You remove the template, connect the lines and then carefully cut out thin strips of the foam to make room for the fins. I found it to be difficult to cut near the base of the cup because of the hot glue, but I did manage to get the glue off. Once you have cut the strips, you mount the balsa fins using white glue. It was easy to align the fins because of the slots in the foam. Once the glue has setup on the fins, you run a bead of hot glue down the sides of each fin to form a fillet and strengthen the bond.
You just need to glue the second cup assembly to the fin can and attach the launch lugs. That is it. Total assembly took less than 1/2 hour not counting glue drying time.
Finishing:
There is no finishing needed for the cups. I did decide to paint the fins which
I did before I mounted them since my paints would have melted the foam.
Construction Rating: 5 out of 5
Flight:
I only had A10-3T engines which is the maximum recommended motor. It was an
incredible flight as the Espresso really took off fast and got some altitude,
although it was a somewhat wobbly boost. Due to the clouds, I had trouble
seeing it but heard the ejection pop. It came down pretty fast on the streamer,
but foam and tall grass are a good combination and there was no damage to
the rocket.
Recovery:
The streamer is perfect for this rocket. It almost does not need a streamer due
to its low weight. The red color in the streamer does help track this rocket
when it disappears in the sky on a really high boost.
Flight Rating: 5 out of 5
Summary:
I am a big fan of the Decaffeinator, but it is a big rocket that is somewhat
difficult to take to launches. You cannot set anything on or near it. The
Espresso is a perfect size and although it is fragile too, it is a fun looking,
easy to build rocket that will call attention to itself.
Overall Rating: 5 out of 5
 |
 |
Flights
Sponsored Ads
 |
 |


