| Construction Rating: | starstarstarstarstar |
| Flight Rating: | starstarstarstarstar_border |
| Overall Rating: | starstarstarstarstar_border |
| Manufacturer: | Clone |
 Brief:
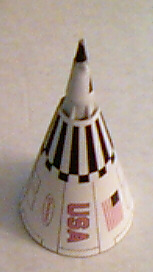
The Point is a rear-ejection cone shaped rocket (finless) that uses the cone as a rigid parachute for recovery.
Construction:
You will need:
- 1 BT-20 2.25 inches long
- 1 conical balsa nosecone (or reasonable substitute)
- 1 piece of 1/8 inch elastic shock cord
- 2 peices of heavy paper or cardstock
- 1/16 inch balsa sheet for internal stiffeners
The instructions were clear and logical, with good illustrations to guide each step. Build the nose/motor tube first and while it dries, move onto the body. You will have to print the body shroud and base rings on the heavy paper. I used 100 lb. bristol board with good results. This is a good sturdy paper, that will curve well without creasing. The color ink went down very smoothly with nice bright saturation. Take care to line up the overlap and tape it down straight. When gluing the cone together, get a couple of scrap pieces of balsa and clip them over the seam (one on the inside and one outside) with clothespins to help make a strong bond. MAKE SURE THE BALANCE POINT IS AT THE MARK IN THE INSTRUCTIONS! Since there are no fins to correct the flight, you have to make sure that the CG location is correct.
Finishing:
Since the body wrap has the detail printed right on it, not much is needed in the way of finishing. Seal and paint your nosecone before gluing the shroud on.
Construction Rating: 5 out of 5
Flight:
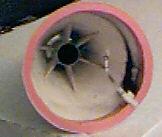
The recommended motor is a B4-2, but I flew mine on a B6-4 (all I had in the B class). The prep is unique, because the motor is so far forward of the base. the instruction recommend making extensions to the ignitor leads, but if you are careful, you should be able to hook your clips up without them touching. The retention device is a small ring of BT-20 tied to the shock cord, then slipped over the motor. Be sure to keep your shock cord out of the way of the exhaust! No wadding is needed, especially if you sealed the end of your nose cone. Flights are straight with the smoke trail following up with the rocket.
 Recovery:
The body of the rocket is supposed to become a rigid parachute of sorts when the the motor ejects to the rear. Remember the warning about getting the shock cord out of the exhaust? Well, mine slipped down and on ejection was burned through. Motor case went that-away and The Point came down like a batmitton birdie, giving the LCO a good look at how this rocket got its name. I will most likely replace the elastic cord with some Kevlar to prevent this happening in the future.
Flight Rating: 4 out of 5
Summary:
PRO's: Interesting and odd. Sure to turn heads when you load it up on the rack. Body wrap makes for a sharp looking model with minimum effort. CON's: Easy to burn through shock cords. Can be a pain to prep if you have large hands. Might be interesting to scale this up for 24mm.
Overall Rating: 4 out of 5
Related Products
Sponsored Ads
 |
 |


