| Construction Rating: | starstarstarstarstar |
| Flight Rating: | starstarstarstarstar |
| Overall Rating: | starstarstarstarstar |
| Published: | 2012-03-20 |
| Diameter: | 6.50 inches |
| Manufacturer: | Rocketarium |
| Skill Level: | 4 |
| Style: | Saucer |
Brief
The Rocketarium Hexagon is a 24mm six-sided flying saucer type oddroc. It can be flown from small launch sites on a wide variety of Estes black powder or Aerotech single-use and RMS composite motors.
Components
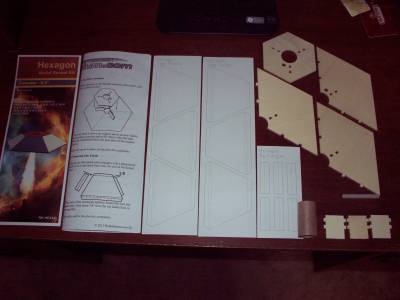
The Hexagon kit complete with the following components
- 6 card stock side panels & rectangles
- 3 light ply base pieces
- 3 light ply internal support pieces
- 1 light ply top plate
- 1 24mm MMT tube
- 1 launch lug
Construction
This kit is rated as a Skill Level 4 but is not overly difficult to build due to the design and the greatly illustrated instructions. If you've built a few regular kits, you'll have no issues with this one.
The construction begins with the gluing of the three individual base plates together to form a single large one. This also becomes the bottom of the rocket. I recommend doing this on a sheet of waxed paper to avoid having the pieces get stuck to your work surface.
Next, after the glue has dried on the base plate, the three internal supports are added and before the glue dries, the top plate is applied. I will also note that all these pieces are self-aligning due to the tabs on the supports and the corresponding holes in the top and bottom plates which makes for a precision assembly that is virtually error-free.
Now the rectangles and side panels are carefully cut from the card stock sheets. Be sure to glue the rectangles onto the rear of the side panels as shown in the instructions or the panels will not fit correctly. The side panels are then attached, one at a time.
After the side panels have all been attached, the MMT tube and launch lug is added to complete the assembly.
Pros: Builds quickly and easily. The tabs and notches virtually guarantee a perfect assembly.
Cons: None noted.
Finishing
Painting this rocket is optional, but is recommended to protect the card stock side panels from excess moisture.
Having six sides as well as a top and bottom, the possibilities of paint schemes for this kit are endless. If using more than one color for the final paint scheme, I would highly recommend the use of low tack blue or equivalent color masking tape. Otherwise, damage to the card stock may result.
For my rocket, I started by spraying it with a light coat of Krylon white primer, waited for it to dry and then sanded lightly. I then sprayed two of the side panels with Krylon gloss white. The next day I masked off the white panels and sprayed two more panels and the top plate with Krylon banner red and the day after that, I masked off the red areas and sprayed the last two panels as well as the MMT tube and bottom of the rocket with Krylon gloss navy blue. All masking was then removed.
Pros: The hexagon design offers endless possibilities for paint schemes - painting optional but recommended or at least clear coat everything.
Cons: None noted.
Flight
The recommended motors for this kit are:
- Estes:
- C11-0, C11-3, D11-P, D12-0, D12-3, E9-4
- Aerotech single use:
- E15-4W, E30-4T, F32-4T
- Aerotech RMS:
- D9-4W, D15-4T, E18-4W, E28-4T, F12-3J, F24-4W
For this rocket, the motor is simply friction-fitted into the MMT tube.
For my flight, I was attending the monthly FLASH launch and due to quite a few people in attendance, I wanted to wow the crowd and decided to use an Aerotech F24W reload. I assembled the motor as usual, but made sure to leave out the ejection charge. I did however plug the forward closure ejection well with a piece of Estes-type wadding and snapped an empty ejection charge cap onto the well to keep the wadding plug in place.
Needless to say, this rocket and the F24W reload did not dissapoint. The launch was certainly loud, smokey and fiery. The rocket really ripped off the pad and climbed up to about 500 feet. At motor burnout, the rocket promptly flipped over and began it's decent back to the ground.
Pros: Flies great on a large variety of motors.
Cons: None noted.
Recovery
This rocket uses aerobrake or drag recovery like most oddrocs of this type. It is sufficient and works well. In my case, upon landing, the motor casing actually popped out the rear of the rocket. I found it on the ground laying right next to the rocket. Be sure to keep this in mind when flying this kit with reloadable motors.
Pros: Fool-proof recovery.
Cons: None noted.
Summary
I really like this oddroc. The hexagon shape is definitely unique compared to the traditional round shape of flying saucers. Also, being equipped with a 24mm MMT, it offers the flier a wide variety of 24mm black powder and composite motors to use with it. If you're looking for a unique oddroc kit, consider giving this one a try.
 |
 |
Flights
Date | Flyer | Rocket | Altitude |
|---|---|---|---|
Sponsored Ads
 |
 |


