| Construction Rating: | starstarstarstarstar_border |
| Flight Rating: | starstarstarstarstar |
| Overall Rating: | starstarstarstarstar_border |
| Manufacturer: | BSD High Power Rocketry  |

Brief:
This is a great sport scale kit that can be easily modified for dual deployment.
Construction:
The parts list:
- 1 4" nosecone
- 1 17" payload bay
- 1 34" airframe
- 4 1/4" plywood fins
- 1 tube coupler
- 1 laser-cut bulk head
- 3 laser-cut centering rings
- 1 54mm motor mount tube
- 1 36" parachute
- 1 tubular nylon shock cord
- Vinyl decals
- Motor retention, rail buttons, and assorted hardware
Added for dual deployment:
- 3 bulkplates
- 1 1/4" U-bolt
- 1 tubular nylon shock cord
- 1 24" drogue chute
- 1 70" main (saved the stock chute for a later project)
- 2 chute protectors
- more assorted hardware
The instructions were well written and photographed. There was a parts list included, and each part was crossed off showing that BSD had checked to make sure that all the parts were there.
The assembly order made sense and started with the motor mount. The centering rings were glued on to the motor tube, then the assembly was glued into the rocket. The fins were next. Epoxy was placed along the root edge and along the edge of the fin slots. Each fin was glued in, then fillets applied. The bulk plate for the payload bay was glued into the coupler about 1/2". The nose cone went into the forward end of the payload bay. No instructions were given on how to hold it on, but there are instructions about the removable rivets, which are not listed on the parts list.
That being said, I tossed the instructions aside and built it as I would have built a scratch built. The fin tabs were too long, resulting in several hours of sanding. The forward two centering rings were glued with a 40 min epoxy and small pieces of fiberglass. The eye bolt was replaced with a U-bolt. The motor tube was then sanded and inserted into the airframe. I tacked the fins in with super glue then used the same 40 min epoxy and shredded fiberglass to do the internal fillets on the fins. The fins were foamed with a 2-part expanding foam. The motor retention consisted of two inserts, two Allen head screws, and Giant Leap style clips. The aft centering ring was epoxied in. The fin can is now completed.
The payload bay was my biggest hurdle as I had never built one before. I cut two airframe bulkheads and one more coupler bulkhead then drilled two holes all the way through them. I bolted in two 1/4" threaded rods for the altimeter sled to rest on. The altimeter bay is similar to a LOC/Precision bay minus the outside length of airframe. I attached a U-bolt at either end and a PVC cup for the main ejection charge.
The shock cords are tubular nylon. 20' for the drogue and 15' for the main chute.
The construction was very straightforward and, by the instructions, you could get a very nice 4" sport scale to be proud of.
PROs: Fun rocket to build. Plenty of room for dual deployment
CONs: Fin tabs were too long.
Finishing:
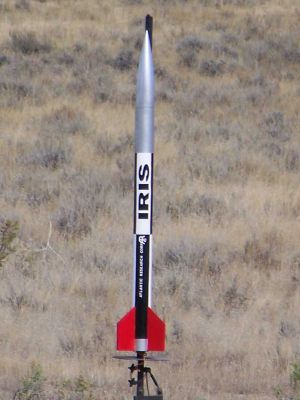
I finished the IRIS with red fins and added some detail to it. Tape can be added to make the scale rings on the
actual IRIS, but I opted not to. The decals for the IRIS name are included but ones for Atlantic Research Corporation
are not. I had several sheets of 1/2" vinyl lettering in the workshop so I decided I would make my own. I also
created the ARC logo with some clear label paper. The letters were spaced evenly and painted over with black paint.
Removing them was difficult but left very nice lines.
Finishing this rocket is difficult, but not unable to be accomplished. It definitely needs standard Atlantic Research Corporation decals.
PROs: Challenging to finish. Looks good
CONs: Challenging to finish. Not enough detail.
Construction Rating: 4 out of 5

Flight:
The first flight was north of Billings, MT, in the middle of October. It was surprisingly warm for Montana. The
rocket was prepped for dual deployment using a gram of black powder for each event. The motor, an I284W, also had an
ejection charge. The motor was put into a Slimline 54-38 adapter then loaded into the mount. The rocket was ready to
go.
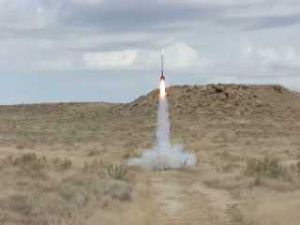
With the igniter in place and the altimeter armed, I was ready to launch. After a quick 5 count, I pressed the button. The I284W came up to pressure quickly. The IRIS ripped off the pad on a large flame and a pillar of smoke.
The dual deployment worked perfectly, bringing it back safely although a little fast. The PML 48" chute still seemed small... The PerfectFlite miniAlt/WD beeped 2328', almost 1K feet short of the predicted altitude. I still think it broke 3K.
The second flight was to take place at our high altitude site near Twin Bridges, MT, at the end of October. The only reason it did not fly was my own procrastination. However, my dad and I flew our Frankenrocket (essentially a stretched PML Tethys) on a K185W to 6228' for our personal best altitude. The weather was perfect, about 60 degrees and not a cloud in the sky or enough wind to ruffle a parachute.
The second flight did take place on November 10 at the Twin Bridges site. The weather was less than perfect: highs in the mid 40's, wind at about 10 mph, and high clouds to making it hard to see any kind of tracking smoke or rocket. The motor was a J540R. The rocket was mostly prepped from the previous launch, only needing the leads for the charges to be hooked to the altimeter and the motor inserted.
After another quick 5 count, the J540R came up to pressure almost immediately. The four to five foot flame was incredible, pushing the IRIS to 5464'. Again, the dual deployment worked without a hitch, deploying our homemade 70" parachute at 700'.
PROs: Very strong rocket that can be launched on a large variety of motors.
CONs: None.
Recovery:
PROS: Very strong rocket that can be launched on a large variety of motors.
CONS: None.
Flight Rating: 5 out of 5
Summary:
The BSD IRIS is a very well designed rocket that can easily be modified for dual deployment. The parachute needs to
be larger by at least a foot to bring down even the stock kit. With proper modifications, the IRIS can fly on many 54mm
hybrid motors and maybe some full Ks. I highly recommend this rocket for anyone who has a little high power experience
or a fair amount of mid power experience. A solid choice for L1 and L2 cert flights.
Overall Rating: 4 out of 5
 |
 |
Flights
 |
 |