| Construction Rating: | starstarstarstarstar_border |
| Flight Rating: | starstarstarstarstar_border |
| Overall Rating: | starstarstarstarstar_border |
| Diameter: | 1.34 inches |
| Length: | 23.50 inches |
| Manufacturer: | Semroc  |
| Skill Level: | 1 |
| Style: | Clone, Futuristic/Exotic |
Brief:
While not an official Semroc product, I consider this a Semroc bird because it
uses all their parts, balsa included. The only non-Semroc parts I used were the
Kevlar, elastic, and engine hook. The rocket strays a bit from the original by
using balsa cones and transitions, but builds nicely into a faithful
reproduction of the legendary Centuri kit.
Construction:
The kit includes:
- BC-1327 nose cone
- BC-517 pod cones (3)
- BR-813 balsa reducers (2)
- ST-13 upper body tube 2.25"
- ST-8 middle body tube 5.75"
- ST-13 lower body tube 8"
- ST-5 pod tubes (3) 4"
- ST-8 engine mount tube 2.75"
- Semroc Taurus laser cut balsa sheet
- Centering rings and engine block from parts box
- 18mm engine hook (Thrustline)
- medium snap swivel (Wal Mart)
- small screw eye (Lowes)
- Semroc 12" parachute
- 36" Kevlar® shock cord
- 24" elastic shock cord
Having previously built a Taurus with Moldin' Oldies parts, I had an idea of what I was getting into at the start of the project, so there was nothing remotely resembling a "gotcha". The first step was hollowing out one of the balsa transitions, which I accomplished with my Dremel tool. Even for a small piece like this, a copious amount of balsa dust is created, so it would be a good idea to consider doing this outside. While this sounded like a good idea when I started, it turned out to be the first mistake that would eventually wind up with the destruction of the rocket.
I knotted the Kevlar® cord into the uppermost centering ring and glued it in place, then threaded it up through the hollowed transition, finally hooking it into the bottom of the upper transition. Since I planned to use a 12" Semroc parachute I wasn't anticipating any problems with fitting the recovery materials into the tight confines of the ST-7 tube. This was my second mistake.
The laser cut fins needed only minimal coaxing to get them to separate from the sheet and were of excellent quality, which I've come to expect from Semroc. They sanded and shaped nicely, but were hard enough to keep the inexperienced from easily going overboard. I tacked them in place with Tite Bond gel CA, then used Elmer's Wood Glue to make thick fillets. The final product felt pretty bullet proof. Little did I know that bullet proof would be necessary.
Finishing:
One lesson I learned with the Taurus that I previously built was not to glue
all of the sections together until after I had painted them. I chose to do a
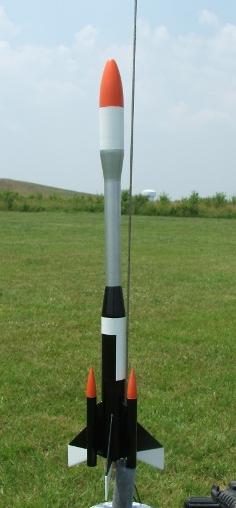
version of the Admiralty paint scheme that was detailed in the instructions.
This is somewhat difficult, but it can be made a lot easier with a little
forethought. After the requisite sealing and sanding of the balsa and body
tubes with thinned Elmer's Fill & Finish, I painted the nose and pod cones
with Harvest Orange gloss. (I used Valspar paints throughout the project.) I
then painted the middle body tube and upper transition silver metallic, the
upper body tube gloss white and the lower transition gloss black. From this
point things get a little more difficult due to the masking.
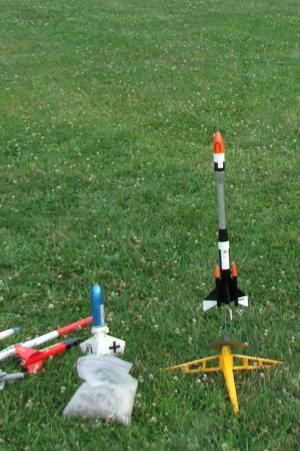
At this point your next move is dictated by your pod preference. If you choose to paint the three pods black, you should have already attached them. If you have chosen the white pod look, it would probably be a good time to spray all three pods and their mounts gloss white, then mask off the pod tubes before attaching the three structures to the fin can. The entire fin can of the rocket should then be sprayed gloss white and allowed to dry for the final masking. After it is sufficiently dry the bottoms of the fins are masked off from the bottom of the body tube to the corner of the fins top edge. I wrapped the circumference of the body tube with masking tape, then laid two evenly spaced pieces of tape down two sides of the body tube to just above the fins. After burnishing the edges to insure the crispest possible mask, the whole fin can of the rocket is sprayed gloss black.
I made the decals using Bel Decal paper. They add a nice finishing touch to the rocket, but if you take the time to do the Admiralty scheme, it's perfectly capable of standing on its own. It's one of the more well thought out paint schemes I've ever worked with. Challenging, but easily worth it.
In the end, I can't say that leaving the pod tubes black did anything for me from an aesthetic standpoint. While it made things easier in the masking step, the pods blend in too much with the rest of the lower section. Painting them black also negates the ability to use any decals in the detailing. When I decide to re-do this rocket, which I plan to do this winter, it will be reborn with white pods and rounded pod cones despite the extra work.
Construction Rating: 4 out of 5
Flight:
Once again, I built a Taurus only to have it last exactly three flights due to
an engine problem. The Taurus that I previously built with Moldin' Oldies parts
had it's flying days ended when a hot Estes ejection charge blew the motor hook
out the back end of the rocket. (I considered that my fault for using a 24mm
engine.) This one had a completely different end from a style point of view,
but it was toast after the third flight just like the other one.
All three flights of this rocket were B6-4 flights and none of them flew like the B6-4 we've all grown to know and like. The first flight was on a blistering hot day at a Quark section launch, and was one of only two flights I managed due to the heat that day. The flight was arrow straight, but the 4 second ejection was more like a two second ejection, noticed by not only myself, but several others on the flight line. The thing that may have prevented a zipper was the six feet of Kevlar® and sewing elastic that I've been overbuilding into my rockets of late due to the hammer-like Estes ejection charges and the Estes dents associated with them.
Flight #2 was on another B6-4 that ejected early. I've only bought my B6-4's of late in the Blast-Off packs, but even that doesn't explain things because some are early while others seem to have the ejection charge timed correctly. They also seem to have double the necessary force to fire the chute. Once again, no damage on this flight, but how long can I live lucky? Apparently not long.
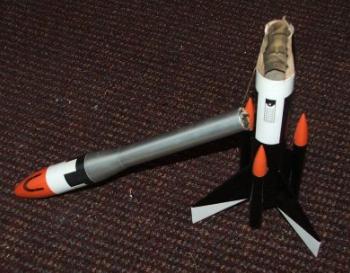
Flight #3 was nothing special; minimal dog barf wadding and a small, tightly wound Semroc chute. The flight itself was impressive because for once the Taurus got to the altitude that I expected with the B6-4 without getting gigged like a dog that's reached the end of its leash. I noticed that the ejection charge was loud, but that's unfortunately what I've started to expect. I noticed that there seemed to be more than just the rocket floating down, but wrote it off as just the wadding until one of the recovery crew yelled that the rocket was broken. Expecting a fin or a pod to have been broken off due to the overenthusiastic recovery crew, I was shocked to find that 2/3 of the lower transition was just gone, leaving a gaping hole in the side of the rocket. I had the kids scour the field, and both pieces turned up, but fixing it was out of the question. What remained of the balsa was shredded.
Flight Rating: 4 out of 5
Summary:
I'm getting more than a little tired of this. I've been sticking mostly to
flying modrocs because of I want to keep this hobby from becoming a black hole
for household funds, but if this keeps up it won't make sense for me to keep
buying rockets only to have the Estes ejection charges destroy them after a
handful of flights. I hate to turn a review of a very nice rocket into a rant
against the current state of Estes motors, but this is getting old.
Pro's: Excellence and selection of the Semroc parts. Laser cut fins. Ease with which you can recreate a classic for very little $.
Con's: Semroc doesn't sell motors yet.
Overall Rating: 4 out of 5
Other Reviews
- Semroc Taurus By Chan Stevens
Brief: While most Semroc Retro-Repros offer slightly modernized versions of Centuri classic designs, Semroc goes "old school" on Centuri, replacing the "innovative" plastic cones and transitions of the 1972 KB-3 Taurus with good old-fashioned balsa parts. This is a futuristic design very nicely done. Construction: Given that the previous reviewer made his ...
 |
 |
Flights
Date | Flyer | Rocket | Altitude |
|---|---|---|---|
2023-04-13 | Kelly I | KV-42 Semroc Taurus Fleet Ship | 75 Feet |
2020-09-19 | Bill Eichelberger | Semroc - Taurus | 500 Feet |
2010-10-09 | Mike Mistele | Semroc Taurus | - |
2010-09-11 | Mike Mistele | Semroc Taurus | - |
2010-09-05 | Mike Mistele | Semroc Taurus | - |
Sponsored Ads
 |
 |


