Estes Mighty Mites Ninja and Sliver (RTF)
Estes - Mighty Mites Ninja and Sliver (RTF)
Contributed by Nick Esselman
| Construction Rating: | starstarstar_borderstar_borderstar_border |
| Flight Rating: | starstarstar_borderstar_borderstar_border |
| Overall Rating: | starstarstar_borderstar_borderstar_border |
| Manufacturer: | Estes  |
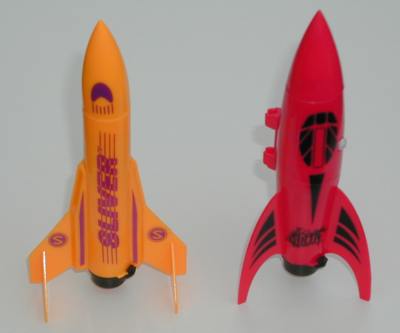
I purchased another set of Estes Mighty Mites from the local Michaels expecting to pay the $10 ticketed price, but was surprised to only pay $5. So, what a deal! The pair included the Ninja and the Sliver rockets. The Ninja being more of a 50's retro-looking rocket with a fat belly and rolling, swept-back fins while the Sliver was much more like a two finned Jayhawk. I was drawn to them because they were different from the Outlaw and the Blitz and Sizzler rockets that I had been flying.
THE ROCKETS:
 Like all Estes Mighty Mites you simply tie an orange nylon streamer onto the elastic shock cord and the rocket is ready for flight preparation. Both rockets had there motor retainer ring in place and there was an extra one in the kit.
The pre-assembled elastic shock cord is tied to the nose cone and is fed through a side port of the rocket and knotted to prevent if from pulling through the hole. These two rockets didn't have a conduit (bubble) that hid the knot. It was recessed into the body of the rockets.
One of the first problems I discovered with both of these rockets was that they did not slide over the Mighty Mites Launch Pad that comes with the Outlaw package. Even after I trimmed away some of the outer lugs they were still a bit rough although much improved.
Overall, for CONSTRUCTION I would rate this kit 2 points taking a lot away for them not even fitting on the launch rod without trimming.
FLIGHT/RECOVERY:
To prepare the the Ninja® and the Sliver for flight, you need to put wadding in then roll up the streamer and push it in along with the shock cord. Then put the nose cone in place. On the other end, you insert the motor and place the retainer over it securing it with a twist. Insert your ignitor and plug and you're ready. The Ninja is a much roomer rocket than the other Mighty Mites, while the Sliver is similar being a very tight fit with the motor, wadding and streamer.
The first flight on each of them was with an 1/2A3-4 and as expected the elastic shock cords burned (not so much as to break, but the 2nd flights would have). Therefore I replaced both with a Kevlar shock cord and was off to fly again.
The Ninja took three more flights on an 1/2A3-4 and then two 1/4A3-3 motors before the shock cord mount on the nose cone broke through.
The Sliver took one more flight on an 1/2A3-4 before its nose cone separated. Also the Sliver never really slid well on the Mighty Mites Launch Pad even with my trimming.
For FLIGHT/RECOVERY, I would rate this kit 2 points. It must be modified with Kevlar just to get more than the one flight for each rocket. I guess I knew this going in, but hey, ya gotta try sometimes.
Overall, the Mighty Mites Ninja and Sliver are nice looking and give you some variety in your Mighty Mites collection, but you must make modifications just to fly them. If you know this going in and make the changes, you'll enjoy the backyard flying activity that these little guys can provide. I give this rocket pair an OVERALL rating of 2 points.
 |
 |