| Construction Rating: | starstarstarstarstar_border |
| Flight Rating: | starstarstarstarstar |
| Overall Rating: | starstarstarstarstar_border |
| Diameter: | 1.33 inches |
| Manufacturer: | Semroc  |
| Skill Level: | 1 |
| Style: | Clone, Sport |

Brief:
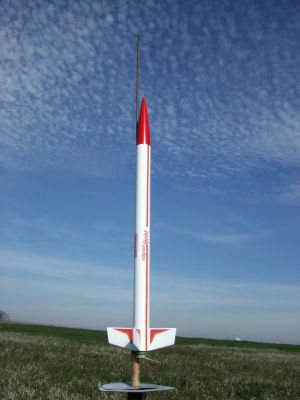
This is a basic 4-fin and nose cone rocket with a fair amount of nostalgia mixed in for good measure. This is one of Semroc's "retro repro" series, which is a modern reproduction of an out-of-production classic. In this case, the Magnum Sprint is a reproduction of a Centuri design from 1982 just before they were folded in with Estes under the Damon ownership model. According to the header card background info, the modern version upgraded to laser-cut fins and features a balsa nose cone rather than plastic, replaces the streamer with a chute, and upgrades the recovery system from rubber cord to combination of Kevlar and elastic.
While the 24mm motor selection would normally send this to some altitudes requiring large recovery zones, this kit also features an 18mm adapter which enables flights down to A's, so it could even be a soccer field flier.
Construction:
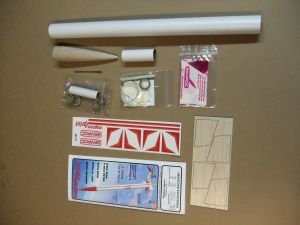
The kit features typically excellent Semroc quality parts, including:
- BNC55AC balsa nose cone (Cherokee D style), screw eye anchor
- BT-55 main body tube
- 3/32" laser cut balsa fins (4)
- 24mm motor tube
- 50/55 thin cardboard centering rings
- 20/50 thick centering ring/motor block
- Waterslide decals
- 12" plastic chute
- Kevlar/elastic shock cord
- 18mm adapter kit (18mm tube, metal hook, centering rings, motor block)

As with the Magnum Hornet, this kit features the modified Semroc instruction format--a single color sheet for header and exploded parts view (front/back) and a couple 8.5" x 11" black and white pages with computer-rendered illustrations. The sheets are 3-hole punched on one side so that they can be stashed in a notebook for reference or even while building.
Overall, this is a pretty simple build, probably a 1 on the 5-point difficulty scale. Construction can likely be done in no more than 1-2 hours plus finishing--I think I spent about an hour and a half working on this and the Hornet together, plus surface prep/paint/decals.
Starting with the motor mount, it's a standard style construction with a metal motor hook and a pair of centering rings. Before putting on the forward centering ring, be sure to loop the Kevlarshock cord around the motor tube or tip of the hook to serve as an anchor. A thick wound paper 20/50 centering ring serves as the motor block reinforcement.
Fins are surface mounted and are slightly forward swept, so pay careful attention to identify the root and trailing edges (it's clearly illustrated but not quite as intuitively obvious as some other designs). I scuffed off the gloss of the body tubes then tacked on the fins using CA, followed by wood glue fillets. Tack on the launch lug and bond the nose cone screw eye, and construction is basically done on the rocket.
The 18mm motor adapter is a slick little module that belongs in your range box and not necessarily mated up with this model all the time. It consists of a standard 18mm motor tube metal engine hook and centering rings. The aft centering ring has a section removed so that you can mount it at the very aft end and still lift the hook to remove the motor. The spacing of the centering rings allows the completed assembly to lock in place inside a regular D-sized 24mm motor mount.
Finishing:
Finishing is a breeze on this--no masking involved if you do it right. I prepped the tube by filling spirals with a little diluted putty, then brushed on thinned Elmer's Fill 'n' Finish to fill the balsa grains on the fins. After a couple coats of primer, I followed up with two coats of Rustoleum gloss white. The nose cone got a finish coat of gloss red.
The waterslide decals provide the finishing touches and make for a really sharp looking finish. I applied a couple thin applications of Future acrylic polish for a nice durable gloss finish.
Construction Rating: 4 out of 5
Flight:
I had an opportunity to test the flexibility of motor choices. After being rained out three straight weekends, I slipped out early one Saturday morning with beautifully clear skies. But at 8:00am, the winds were already blowing at 15 on their way to 20 mph. The soccer teams were starting to arrive, wiping out half the recovery drift range. I put the D12-7 back in the range box, pulled out the 18mm motor adapter supplied with the kit, and loaded up a B6-4. Sure, it was a wimpy choice, but I wanted to make sure I got this one back without being trampled on.
The flight was pretty low, barely hitting 100-150 feet. So low in fact, that I'd question whether or not an A is even a decent idea. Trajectory was straight up, not even weathercocking, and the 4 second delay proved to be perfect.
Recovery:
The chute deployed fine, although in those winds the whole rocket was really getting knocked around and blown downwind in a hurry. Within a few short seconds, it had cleared the first soccer field (thankfully empty) and wound up landing about 120 yards downwind. No damage, perfect flight, and on a calmer day it will go back up on at least a full C, if not the D12...
Flight Rating: 5 out of 5
Summary:
PROs: Good value, great flexibility, and can practically call your own shot in terms of altitude. Come to think of it, NARAM has a random altitude event this year...
CONs: None. This is a fine rocket though I can't spring for a full 5/perfect rating for something that is, after all, still a basic 4FNC design.
Overall Rating: 4 out of 5
Other Reviews
- Semroc Magnum Sprint By Eldred Pickett (August 1, 2009)
( Contributed - by Elred Pickett - 08/01/09) I had previously built the Magnum Hornet, and this kit is a few inches longer. Like the Hornet, this is a reproduction of an old Centuri kit that has slight changes from the original. It has features that I assume come with most(all?) Semroc kits: balsa fins on a laser-cut sheet, balsa nose cone, Kevlar shock cord to tie to the motor mount. ...
- Semroc Magnum Sprint By Jeff Lane (May 13, 2009)
Brief: Simple 4FNC rocket with parachute recovery. Chan's review is complete and my experience was pretty much the same, so I'll just try to add a few comments and photos. For instance, the marketing people at Damon/Estes borrowed the Magnum moniker because it equates with "over powered". That's true with this kit. A D12-7 will easily send it out of sight. Con ...
 |
 |
Flights
 |
 |