× We have recently moved to a new server. If you run into any issues, please let us know through the Contact Us link at the bottom of the page. Thanks for visiting RocketReviews.

Estes Big Bertha

Estes - Big Bertha {Kit} (1948, 23, 7007)

Contributed by Clive Davis

Construction Rating: starstarstarstarstar_border
Flight Rating: starstarstarstarstar
Overall Rating: starstarstarstarstar_border
Diameter: 1.64 inches
Length: 24.00 inches
Manufacturer: Estes
Skill Level: 1
Style: Sport
Rocket Pic

Background:

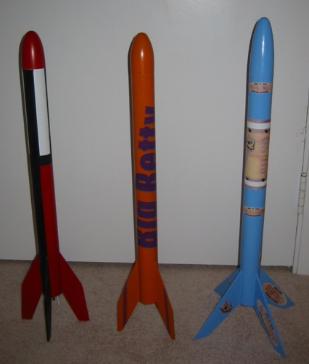
This spring I ran a build session for faculty kids at the school where I teach. I ended up using the Quest Bright Hawk for the 7-9 year olds and the Quest Big Betty for the 10-12 year olds. After the build session, I began thinking about the types of rockets that would make great first builds for a budding rocketeer. I wanted to select rockets to compare that had the following in common:

  • BT-60 body tube
  • Parachute recovery
  • Balsa fins
  • Engine hook motor retention
  • Reasonable Price
  • Stable flight performance
  • A rocket that can fly on small athletic fields and can be viewed in all aspects of flight. In other words, no Alphas, Wizards, or Vikings.

I ended up selecting 3 rockets that fit these criteria. The Estes Big Bertha, the Quest Big Betty, and the Fliskits Rhino.

Click Here for the Comparison Article.

Construction:

The Big Bertha is your standard Estes Skill Level 1 bird. The instructions are adequate, and the parts are usually average to above average in quality except for the shock cord (too short). The motor mount is easy to construct, and the engine hook is simple to add to the motor mount. What is nice about the Big Bertha is the length of the motor mount. This reduces the overall amount of the body tube that needs to be pressurized at deployment time. It also makes it easier for clumsy hands to handle. The fins are die cut and require minimal sanding to get a good finish. Remember, I tried to build the Big Bertha as a beginner would. Using the double glue method, it is easy to get the fins on the body tube. I added fillets to the fins and added the very long launch lug to the body tube. As is the case with many Estes kits, the parachutes may arrive already with shroud lines attached. All I needed to do was add the shock cord using the tri-fold method, attach the parachute and attach the shock cord to the nose cone.

Finishing:

Finishing consisted of priming and Fill-N-Finish. I then painted my Big Bertha with a 60’s design. Had I finished the rocket as a skill level one bird, I would simply have given it a solid coating of black and put on the one simple self-stick decal sheet. Since this was the Big Bertha, a classic, I did give myself the liberty of designing it my way, rather than the simple black.

Construction Rating: 4 out of 5

Flight:

I have flown my Big Bertha on B6-4s, C6-5s and even a D21-7. This bird always turns in a solid performance flight after flight. It is very easy to prep and pack the parachute. With the size of the rocket and the big swept back fins, the Big Bertha can be a great demonstration model to be enjoyed in all stages of flight and recovery. This is probably one of the reasons why it is a classic.

Flight Rating: 5 out of 5

Overall Rating: 4 out of 5

Other Reviews
  • Estes Big Bertha By Bill Eichelberger

    Brief: Everybody's favorite prom date, the Estes Big Bertha, is a rocket that seems to wind up in every fleet at one time or another. While there are a lot of other rockets in her size range that equal her low, slow, and always stable flights, there's something to be said for building and flying the original. Bertha's getting a little long in the tooth these days and in need of an ...

  • Estes Big Bertha By Paul Gray

    (by Paul Gray)  Background The Big Bertha is a classic rocket built and flown by thousands of people around the world since 1965. Its was designed to have a rather impressive size and to develop the skills of people who are advancing themselves further in the hobby of model rocketry. Because of its size and performance, it is a great rocket to fly on a football field on C motors, ...

Flights

Comments:

avatar
K.R.J. (November 1, 2000)
The Big Bertha was the first "big" rocket I ever built. I got one when I was 12 and in the hospital. The nurses all thought I was crazy for building a model rocket in a hospital bed, but it went together well. ( I didn't paint it there, though!) Years later, after moving to Europe, my friend Ernst bought me one for Christmas. He couldn't believe that I had one as a kid! This is absolutely the best kit Estes (or Robbe GmbH) ever put out. Period. [As far as the review] Exactly the same experiences. Had to chase mine a half mile once because of the large parachute.
avatar
J.W.P. (January 1, 2001)
Big Bertha is the favorite in our fleet. We have never had a bad launch. Specifically, the large tube size let the chute pack loosely and it opens well. Also, this model tends to weathercock. This means it tends to angle into the wind on its own. The harder it blows the more it flies into the wind and is more likely to land back in the launch field.
avatar
D.T.H. (January 1, 2001)
This kit is quick and easy to assemble. I have been flying my kit for about 6 years. It takes a lot of abuse and keeps on flying. A great first kit for kids. I always take it with me to fly.
avatar
P.D.M. (May 1, 2001)
This is a great, classic rocket with good size (for an Estes kit). I built it with a 24mm (D&E-size)engine mount and I added epoxied BBs in the nose to offset the additional weight. I also replaced the cheap Estes chute with a Rogue 18" nylon chute with a spill hole cut out. I then painted mine a combination of black and turquoise to set it apart from the rest of my rockets. I first launched it with a D12 and it flew great! Straight and high. Then I tried an Aerotech E15 and it was spectacular! My last flight of the day was with another E15 and another great flight, but the winds took it almost out of sight and an hours search was fruitless... it was gone. A great kit and I highly recommend the 24mm engine mount, but get ready to get on your horse for recovery.
avatar
D.P. (July 1, 2001)
My Big Bertha has flown 32 times on everything from an A8-3(low flight)to a D21-4T(great flight) as of 6/27. It now has very thick epoxy fillets on the fins because of them coming off and gluing them back on. I switched out the 18" chute after 28 flights because of excessive drift for a 14" one. The review was right on. The reviewer did not think the drift was bad, but it became a problem for me. Otherwise, I would rate the Big Bertha at a 4.5 out of 5.
avatar
D.H. (October 2, 2001)
I've had my Big Bertha for just under a year now and have launched it probably twenty times. Visually, I don't find it all that impressive, but it sure is reliable. In fact, just the other day, I had to launch it with no recovery system at all. I had forgotten that I removed the parachute, but it flew great. Four great flights and only one tiny tear in the body tube.(fixed on site of course!). I always launch the Bertha first on launch day, to test the winds, because I know I will get it back. Long Live Bertha!
avatar
M.B.H (October 11, 2001)
The Big Bertha is probably my favorite rocket. It's robust, reliable, and has great flights. I launched it one day four times, compared to one or two for my Rattle-7. I flew it on an A8-3, for a low, short flight, B4, B6, and a C6 drag race with another Bertha on an Aerotech RMS D. A sweet rocket that I personally do not think I could ever do without again, now to get a couple more to add to my inventory...
avatar
M.C.L (December 26, 2001)
I flew a 1969 model that was the original and had been stored in a box in a garage for 30 years. It has the balsa nose cone and fins. The things to look out for when building this model are the fins. If you use balsa (I recommend retrofitting the newer Estes model with balsa fins), glue them on with Epoxy. I also used epoxy on the motor mount and the shock cord mount. It ended up as an all-epoxy model. The added weight did not affect the C.G appreciably. I added a heavy duty snap swivel and 1/4" elastic shock cord from a fabric store. I sealed the nose cone and fins with Elmers fill-n-finish and sanded each with 400-grit for a perfect finish. I finished mine with OSH spray paint in purple, red and yellow. I made a custom decal (since the original model had no decals, unlike today) for mine. I did the design in color using Adobe Photoshop. I then printed that at Kinko's on their color laser printer but I had them print it on what they called "sticky back" which is a clear, adhesive-backed film. I cut out the design (leaving a 1/8" margin) and stuck that to my model. Final cost? About 2 bucks. Looks awesome. The model is then clear-coated for a mirror finish. I modified this big Bertha with a homemade 24" ripstop nylon X-form parachute. It is heavier than the Estes plastic one that comes with the model but it is built like a tank (to match the rocket). Estes hit a home run with this model. It has flown countless times and has never given a bad performance. It flies straight and true and recovers perfectly each time. I fly it on C6-5's due to the extra weight and it performs flawlessly. This is a great model for an intermediate beginner and will never cease to impress your friends. I recommend not using the black paint job and, instead, coming up with your own design for this odd-looking bird. The crowds love it and it will fly and fly again.
avatar
B.A. (March 24, 2002)
I luv my Big Bertha. The only troubles I've had is that after about 10 flights the engine mount began to come loose. I think I'll use it as an experiment platform. I love how it goes up nice and straight and has a graceful landing.
avatar
J.R. (July 30, 2002)
My only quam with building this rocket came from the motor mounts and the shock cord system. For the motor mount before it's installed make eight small balsa triangles (gussets) with the scrap balsa that is leftover from the fins. Make them small enough so you can glue them every 90 degrees around the forward mount (these would be in the aft position) and the rear motor mount (these would be placed forward of the aft rings). Also replace the shock cord with a Kevlar® cord that could wrap around engine and threaded through the forward ring then attach sewing elastic (found in fabric stores) just after the Kevlar® cord exits the body tube. I used Fill n Sand for sealing the fins and used a wet finger to make real smooth fillets which I then sanded with 220 then 400 grit for a nice finish. Primer, sand ,primer, sand (600grit) tack cloth then paint two coats of color followed by three coats of clear...AWESOME!
avatar
D.W. (April 5, 2003)
You just need to look at the amount of entries in the flight logs for this rocket, and count the number of times words like 'perfect' and 'great' are used to show what a class rocket the Big Bertha is. Its not the highest flyer; but the slow, realistic take off, and the lovely slow arcs to apogee makes up for that!

comment Post a Comment