| Construction Rating: | starstarstarstarstar |
| Flight Rating: | starstarstarstarstar |
| Overall Rating: | starstarstarstarstar |
| Manufacturer: | Qmodeling  |

Brief:
The Mrs. Andromeda is a 1.65:1 upscale of the classic Estes Andromeda, kit #1273. This kit was first introduced in
1975, and remained in production until 1982. Q-Modeling has taken the original design, upscaled it, and modernized its
construction.
Construction:
- Scale: 1.65:1
- Height: 72.25"
- Weight: 14.0 oz (with recovery system)
- Fin Span: 19.68"
- Crew Compartment Tube Diameter: 1.67"
- Main Body Tube Diameter: 1.21"
- Decals:
- Launch Lug Size: 1/4"
- Engines: E or F (Recommended F21-6W, F24-4 Reloadable)
- Average Altitudes: 250' E9-4 (No Wind), 600' F24-4, 900' F21-6W
- Multiple Recovery System Build Options
- Assembly jigs (consistent build quality)
- Laser Cut Parts
- Foil lined Engine Mount Tube for long life
- 30" Octagon, Thin Mil, Ripstop Nylon Parachute
- 9" x 9" Nomex® Chute Protector
- 9' Kevlar® Shock Cord
- Detailed Step-by-Step Instructions
Stop! Before you build this kit, read the directions. OK, you've been told that on many occasions, but this time, you actually need to do that. This is because there are 3 ways to build it, depending on how you want the deployment. I went with "Option 3". This is the way I built my 4.16 upscale, and although I'm sure the other two deployment options work just fine, I have confidence in this method.
The quality of the components is unparalleled. Every component in this kit is the highest quality available. Even the wooden dowels are poplar. (That's why they have a green tint to them.) Poplar is a strong, moisture resistant wood that warps less than others. The tubes are all the heavy, white, "no-seam" type. The coupler tube is extra long and very thick.
The design of this kit goes way beyond most kits out there. This kit was engineered, not just created. The creativity in the design and construction is tremendous.
The jig is unlike anything I've ever seen. It is made from laser cut pressed wood. The engineering that went into it made building this rocket much easier. Without it, the skill level on this kit would be two steps higher. This is something I guarantee you won't be able to bring yourself to throw in the trash when you are done with it.
I only slightly beveled the fins. I do this on many of my rockets to give them a "beefier" look when streamlining is not a concern. Besides, a rocket in space doesn't care about drag.
The paper transition was no trouble, but I've never liked them. I always prefer a balsa transition because they always look nicer and take no time. I don't think a balsa transition would work here if one chose to use the "ejection through transition" option. Regardless, it's not a "con" it's just a preference.
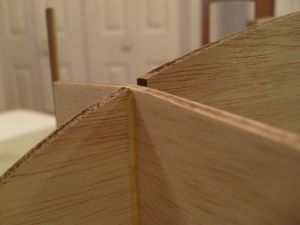
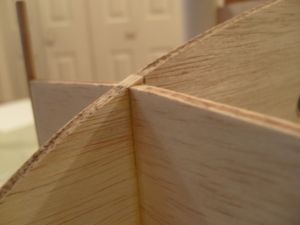
The only modification I made to the kit was in the "antenna mast" area. The build left a notch-like gap here. I just took a 3/16" wide scrap of balsa, glued it in place, and sanded it to match. See the picture for the before and after.


Little else needs to be said about the build. It went relatively fast with no problems because of the easy-to-understand instructions.
Finishing:
As always, I start with two coats of Rustoleum gray primer with sanding in between coats. The manufacturer recommends
painting it with gloss black. The original Andromeda was recommended to be painted flat black, however, decals never
adhere well to flat paint. I paint all my Andromedas--or is that Andromadae?--with the Rustoleum satin black. The
decals adhere just as good as on gloss paint, and I think that the satin finish looks better than gloss. It's a
compromise between flat and gloss. I used Testors #1628 gloss enamel for the inside of the pods. I left my reactor
rings black. The only original kits showing them white are the 1975 and 1976 years of production with the blue and
white face card. All subsequent kits issued were shown painted black, and this is the version I have always scaled.
The decals went on without trouble. These are the high quality type that don't need to be cut out to the edge of the color, like the single sheet type.
The finished weight of my build was 14.4 oz. Not too far from the listed 14.0 oz. But, I chose not to use the 9" x 9" chute protector to save weight and packing ease. I used dog-barf instead. If I had chose option 1 or 2, I may have used the chute protector.
Construction Rating: 5 out of 5
Flight:
I simmed the kit to determine an engine to use. I do trust the manufacturer, but I wanted to learn max velocities and
such. I chose to use the F21-6W, just as they did. My simulations showed a max altitude of 1075 vs 900 that the
manufacturer reports. Perhaps my higher number was from more coast with a slightly heavier rocket. They say you can use
an E9, but my sim shows that to be dangerous.
Her first flight was at NERRF 4 on the F21-6W. The flight was slightly into the wind and the ejection was very close to apogee. This is a perfect motor for this bird. Too bad AeroTech stopped making them. Unfortunately, I was unable to get any pictures of the flight.
Recovery:
The chute came out with the rocket hanging in midair while it was still pointing up. The flight went without incident
and no damage was evident. The descent was just right; not too slow so it drifts away, not too fast to break parts on
landing.
Flight Rating: 5 out of 5
Summary:
I should first point out that everything is this paragraph is just me being an anal-retentive Andromeda fan. The
Andromeda has been my favorite ship for over 30 years. I have several in my collection from the Micro Classics version
to my 16 foot tall version I built for my level-two certification. That said, you know that I approached this kit with
30 years of Andromeda experience and a highly critical eye. When I saw that it was finally released, I happily paid the
$120 for the kit. That said, There were a few things not scaled properly. The manufacturer reports having an
"authentic nose cone", but the nose cone is not a good match to the original profile. But I doubt most people
will notice. Oddly, the correct shape nose cone is depicted throughout the directions. The decals were red. Not good. I
have several original Estes Andromeda kits both built and in the package and they are all orange. The "portal
plates" are in the wrong place. They give you the decals to go next to them, but they won't fit where they are and
the directions don't show where to put these decals. You don't really have much of a choice if you go with option 2. If
you go with option 1 or 3, glue them 4½" from the coupler, 90 degrees from the "Andromeda" decal.
I also had a problem fitting the forward decals on the reactor pods and I have yet to figure out why.
None of these nit-picky details are worthy of taking from the review points. I sure I'm the only one that would even notice, and this is an upscale sport flier and not supposed to be an exact replica.
Finally, I wrote this review before I noticed that someone had already done one. I thought about changing my review to complement the review that Geoff Givens wrote, but I ended up leaving them as they were and just adding this note. To that I'll add: I received my kit after the instructions had been revised. I found no problems with them in any way. The only thing that I disagree with Geoff's review is that this kit is just barely a 4 skill level. Definitely not a 5. The long motor hook was long to accommodate AeroTech F and Estes E9 motors.
Overall Rating: 5 out of 5
Other Reviews
- Qmodeling Andromeda By Chan Stevens (November 29, 2008)
Brief: This is probably going to be considered the flagship bird of Qmodeling's upscale/mega retro series. It's a 1.65 upscale of the Estes classic Andromeda. As noted in the other fine reviews, this is a magnificently engineered design and a sheer pleasure to build and fly. While I will cover some construction detail and pictures, I'd also highly recommend Bob Cox's construction ...
- Qmodeling Andromeda By Geof Givens (May 3, 2008)
Brief: The Qmodeling Retro Mega Series Andromeda is one of the most formidable mid-power kits available. This beautiful kit is a 1.65:1 upscale of the Estes Andromeda. QModeling's BT-60 version stands nearly 6 feet tall. The 24mm motor mount is designed for high-thrust APCP motors such as F24-4 or F21-6. Construction: There are over 80 parts and also more than 80 construction ...
 |
 |
Flights
 |
 |
 |
 |
T.S. (July 4, 2008)