Oregon Scientific ATC-1000 Action Camera
Oregon Scientific ATC-1000 Action Camera
Contributed by Dr. Thomas Rackers
Brief:
In the process of researching digital video cameras intending to try mounting
one in the payload section of a rocket, I ran across the ATC-1000 Action Camera
manufactured by Oregon Scientific. This is a digital video recorder built into
a cylindrical casing intended for sports applications such as mounting on
helmets, handlebars, athletes' limbs, or what have you. The ATC-1000 looked
like it had potential for use in a camera rocket so I picked up one from an
eBay vendor. I found out later I could've saved a few bucks and gotten it
sooner if I had ordered it through Best Buy's web site (it is listed under
"Kids' Electronics").
Construction:
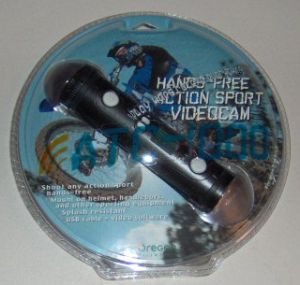
The camera comes in one of those welded-shut plastic bubble packages that are a
pain to open. Once you get the package open, you find the camera and a lot of
additional parts:
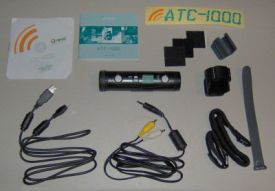
- various straps and clips for mounting the camera
- audio/video cable
- USB cable
- software CD-ROM
- user's manual
- clear logo sticker
- four AAA batteries
- optional SD memory card, up to 1GB capacity
The camera itself feels pretty solid, if for no other reason that it weighs in at about 138 grams with alkaline batteries installed, or about 122 grams if you use Energizer Photo Lithium cells (the blue and silver ones). Here are the important specs for the camera, some of which I had to measure for myself:
- Loaded mass: 138 grams (alkaline batteries) or 122 grams (lithium batteries)
- Dimensions: 35 mm diameter x 140 mm length (end cap is closer to 37 mm diameter)
- Built-in memory: 32 Mb
- Optional SD card capacity: 1GB max
- Image formats: JPG for still photos, AVI with sound for videos
- Image resolutions and frame rates: 640x480 @ 15 fps, 320x240 @ 20 fps, 160x120 @ 25 fps
- Field of view: 36 deg H x 27 deg V (4:3 aspect ratio)
- Depth of field: 1.5 meters to infinity, fixed focus
The following table gives my best estimates on total video recording times for the camera, based on image resolutions and frame rates. Note that plugging in an SD card disables the built-in memory. I've listed a 128 Mb card because that's the size I have loaded into my camera.
| 640x480 @ 15 fps | 320x240 @ 20 fps | 160x120 @ 25 fps | |
|---|---|---|---|
| Built-in 32MB | 2 minutes | 6 minutes | 19 minutes |
| Add-in 128MB | 8 minutes | 24 minutes | 1 hour 17 minutes |
| Add-in 1GB | 1 hour 4 minutes | 3 hours 12 minutes | 10 hours 14 minutes |
Below are pictures of the camera by itself and next to a 12-inch ruler and a standard 18mm C6 rocket motor for comparison.
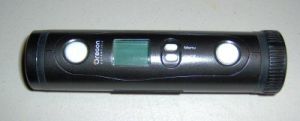
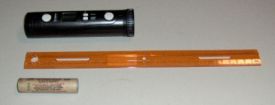
The camera has an LCD display and four buttons: On/Off/Enter, Menu, Snap Photo, and Start/Stop Video. The Menu and Enter buttons allow you to select which of the three image resolutions you want to use, enable or disable the 10 second snapshot timer, and delete either the last image (still or video) or all images in memory. Navigating through the menu options takes a little practice, and one time I did manage to get the camera so confused that I had to pop the batteries out for a few seconds to force it to reset itself. If you don't switch through the different resolutions very often, as is my plan, you won't have to deal with the menu very often.
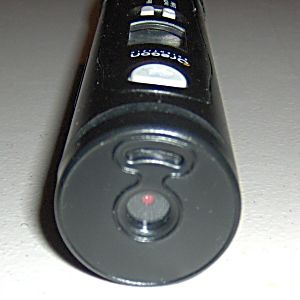
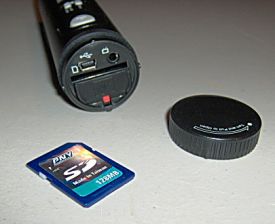
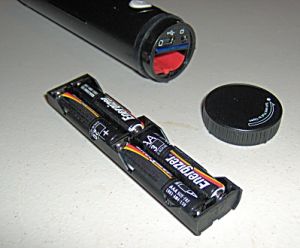
Here are pictures of both ends of the camera. In the first photo you can see the microphone located above the camera lens. The other two photos show the back end of the camera with the twist-lock cap off. You can see where the SD card and the battery tray slide into the camera. Also visible on the back end are the USB 1.1 and A/V jacks matching the cables come with the camera. When the camera is plugged into a live USB port, it draws power from the port instead of the batteries. The camera's internal or add-in memory (but not both at once) are then accessible by your computer as a removable drive assuming you have already loaded the included software. (More on this below.) The A/V cable lets you connect the camera directly to a TV or VCR so you can play back your recorded images. In this mode, the Menu and Enter buttons control on screen VCR-like buttons.
Since I only plan to use the camera to record video files, I've recorded short AVI video files of moving vehicles to compare the image resolutions and frame rates. The video files can be found by clicking on the following links.
| 640x480 @ 15 fps | (2.0MB) |
| 320x240 @ 20 fps | (1.3MB) |
| 160x120 @ 25 fps | (0.7MB) |
For my rocketry application, I plan to make small balsa wedge shaped shims to wedge into the battery tray alongside the contact springs at the negative ends of the batteries. This is to prevent the batteries from compressing their springs during acceleration and losing contact at their positive ends, which would cause power dropouts in the camera.
Overall, I'd take off half a rating point for the awkward design of the controls. So my score for the camera itself and accessories: 4.5 out of 5.
The CD-ROM includes the drivers for the camera, which are installed when you load the supplied Action Lab video editing software. On my system, the computer couldn't access the camera memory until this install was done.
The real problem is with the Action Lab software itself. I really do not like software that insists on hijacking the computer's entire screen so I can't access other applications, and I definitely dislike software that insists on changing my screen resolution to its liking, even if it does restore it when the software exits. Unfortunately, Action Lab does both. The feature set seems fairly complete, but just the sheer rudeness of the software in taking over my desktop completely soured me to its use. Fortunately you don't need Action Lab to download your snapshots and videos, so I just choose to pretend it's not there. If I need to do any editing of the files, I've got Paint Shop Pro for the photos and Windows Movie Maker for the videos.
At least the camera driver seems to work alright for downloading. My score for the supplied camera software: 2 out of 5.
Summary:
Since the camera package's major shortcoming of the software can be worked
around easily enough, for its potential use as an onboard rocket camera I'd
give the ATC-1000 an overall rating of 4.5 out of 5.
For my next trick, I will take a Public Missiles 9 inch long by 2.5 inch diameter payload bay and convert it into a camera bay for the ATC-1000 with plans to launch it atop my PML Explorer high power rocket. Stay tuned.
 |
 |
 |
 |
T.W.R. (December 27, 2006)