Modification Big Wild Daddy Modification
Modification - Big Wild Daddy {Modification}
Contributed by Tony Turley
| Manufacturer: | Modification |
 The Estes Big Daddy first caught my eye hanging on the rack at WV Hobbies in the fall of 1998. It looked to me to be a good candidate for conversion to 29mm power, so I put it on my Christmas list. My request was granted, and away I went.
My first decision was to evaluate the kit parts to see what I would need for the conversion. I ended up keeping only the fins, body tube, nose cone, and main decals. I ordered a LOC 29mm stuffer tube from Magnum, and using fly cutters in my drill press, I made new centering rings from 1/8" birch ply. The motor retaining rods are 4/40 threaded rods, on opposite sides of the stuffer tube. I used a small round file to cut notches in the centering rings for the threaded rods, then everything was epoxied together and set aside to dry. A special note here is that I used the fins to position the centering rings, as I wanted the fin tabs to be a snug fit between the fore and aft rings. Although Dark Star motors have a lip on them, and many people use masking tape to make a thrust ring on other 29mm motors, I also glued a motor ring on the inside of the stuffer tube, just to be sure.
I glued the motor assembly in place using the fins for alignment. I cut 3/32" off the edge of each fin tab to get a tight fit against the body and stuffer tubes. Before gluing the fins in place, I saturated each one with thin CA, and let them set overnight before sanding them to remove the raised grain. I glued the fins in place with Pica Gluit - at which point, I hear you all gasping. Pica claims Gluit is stronger than epoxy ("Yeah, right!!" you say.) Gluit is thinner than epoxy, and wicks into wood grain and paper very well. I have complete confidence in its strength. But don't worry - I filleted each fin and centering ring with epoxy after the Gluit dried.
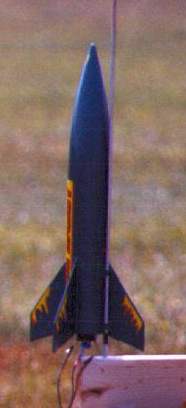
 The entire rocket (except the NC, of course) was covered with .75 ounce glass cloth. A light mist of 3M 77 was used to hold the cloth in place, and Gluit was rubbed generously through the weave. An important thing to point out here is that I ALWAYS sand body tubes to remove the glassine covering; this helps the glue get into the fibers of the body tube better. Each set of ribs was covered with a single piece of glass cloth: from the tip of the rib, down across the fillets and body tube, and up to the tip of the adjacent rib. The top of the BT was covered with a single wrap of fiberglass. Gluit also sands well, without gumming, which left a smooth finish for the primer. I glued 1/4" launch lugs into one of the fin joints, and filleted them with epoxy and microballoons. After the minor imperfections that the primer revealed were filled and sanded, the entire rocket was painted with Krylon Hamm-r Tough Hunter Green, which gave a nice hammered metal finish. I also had several sets of Estes Wildfire decals, and I sliced these apart to create what I feel is a striking color scheme.
I added 3+ ounces of clay in the nose cone, held in place with another couple ounces of epoxy. The shock cord mount is a 3/16" eye bolt held in place by two nuts epoxied to either side of the top centering ring, and the shock cord is attached by a heavy-duty Swivel Eye Spring Snap from K-Mart's hardware section. Recovery is by a bright orange 30" Top Flite X-Form chute from Magnum.
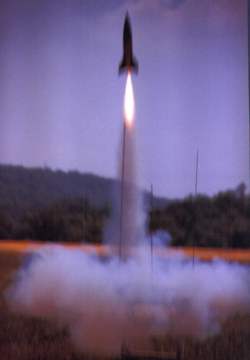
Empty weight of the rocket is 17 ounces, and as those of you who were at the June 12 launch can attest, Big Wild Daddy gets airborne in a hurry on either an F62 Dark Star or G35 Econojet. I look forward to future such conversions - can you see a Big Bertha flying on Aerotech D21's?
#Related Reviews
- Modification Bad Dad By Larry Brand
Brief: I modified the Big Daddy kit to replace the stock nose cone with a fixed nose cone made from a PET soft drink bottle; parachute deployment is from an open "mortar" mounted on the bottle opening. Rationale? I swiped the nose cone from a family member's Big Daddy kit to use in a building ...
- Modification Big Bad V-2 Daddy By Michael Bade
How to Make a V-2 out of an Estes Big Daddy Frustrated with the lack of availability of an affordable V-2 kit, I started thinking of ways to come up with a cheap and easy kit-bash from an existing in production kit that wouldn’t involve a lot of money or time. I also wanted to make a ...
- Modification Big Daddy (29mm) By Stephen Morrow
Brief: Modified Estes Big Daddy to fly on 29mm motors. Modifications: I started this project with a regular Estes Big Daddy. When I bought the kit I knew I wanted to mod it to a 29mm so I bought a motor tube and cut it to a length that would allow it to come up and touch the base of the nose ...
- Modification Big Daddy (29mm) By Sascha Grant
I've always liked the Estes Big Daddy, but even flying on an E just wasn't good enough. So I went about building this to fly on a H - the H128 specifically. Components Out of the box, the kit includes: Nose Cone Centering Rings Pre-Slotted Body Tube Motor Mount ...
- Modification Big Daddy (3) By Mike Goss
A modification to the Estes Big Daddy to use much less wadding. Modifications: The Estes Big Daddy is a short, fat rocket. With this being the case, there is a large volume in the interior of the rocket that needs to be filled with wadding to protect the parachute. I am always looking for ...
- Modification Big Dipper Daddy By Dick Stafford
I bought this Big Daddy (on sale, of course) as a test-bed for a Micro-Hybrid motor. This required an extension of the motor mount, and the capability to house electronics in the nose cone. Before flying it on a Micro-Hybrid, I'll probably try it on a conventional motor with motor ejection (1st ...
- Modification Dig Baddy By Yitah Wu
What is it about the Fat Boy, Onyx, Minie Magg, etc, that makes grown men's knees weak? I don't know, but the Big Daddy has it - and lots of it. I swung by Commonwealth Displays a couple of times, but they were out of the kit. The second time I was beat out by a telephone order by an hour or ...
- Modification The 'Big Daddy' Educator By Joy Sills
The Educator is a modified Big Daddy. The modifications include adding a 12" payload section and using basswood for fins and centering rings. Modifications: The first modifications were adding basswood fins and centering rings. The second modification was adding a payload section. This was ...
- Scratch 3D Mega Daddy (3D MD) By Steve Lindeman
I was playing around with my Estes 'Big Daddy' one day when I discovered that its NC would fit the tube that my Aerotech Initiator came packed in. The decision was then made to acquire another Big Daddy and build the 3D Mega Daddy (3D MD). Components Only 3 components ...
Related Products
 |
 |