Scratch Stratosphere Original Design / Scratch Built
Scratch - Stratosphere {Scratch}
Contributed by Dick Stafford
| Manufacturer: | Scratch |
Stratosphere

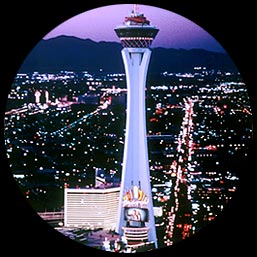
We recently took our daughter to Las Vegas for her 21st birthday. I soon noted that every casino seemed to have souvenir daquiri glasses reflecting their theme. I managed to resist them, including the cool Eiffel Tower shaped glasses from Paris. After all, drinks are free while you are throwing your money away! Well, we ended up going to an inexpensive daytime show at the Stratosphere Hotel, Casino and Tower, which included a drink. So, I caved in and collected a couple with rockets in mind.
 Parts List:
- one slightly used souvenir daquiri glass.
- 29mm mmt tube
- 12" section of 38mm tube
- 1 1/4" section of 2" dia. shipping tube
- masking tape
- one home grown 3/16" 29mm to ~2.5" centering ring
- 1/16" G10 stock for fins
- 3 1/2" section of 38mm tube
- cardboard core from electrical tape
- scrap 3/16" plywood for nose cone bulkhead
- one plastic plug - original use unknown
- section of styrene tube
- section of neon green solid plastic tube
- small section of brass tubing for a launch lug
- ~4" of Kevlar twine
- eyebolt
- 12" nylon chute from the rangebox
- adhesive backed holographic film
 Construction:
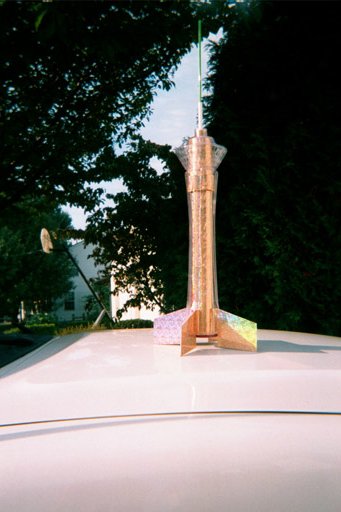
The daquiri glass separates right below the tower's top, making a natural transition between the body and nose cone. I quickly found that 38mm tubing from Giant Leap fit nicely into the body and nose cone sections. So, I cut a 12" section for the body and 3 1/2" section for the nose. The nose was quite snug, but the body wasn't. The solution was a small section of mailing tube inserted into the front of the body, between the 38mm tube and the outer shell. I decided on a 29mm mount since that's what I had on hand (plus it allows the use of 24mm motors with an adapter). I made centering rings out of masking tape soaked in CA (idea borrowed from Aerocon).
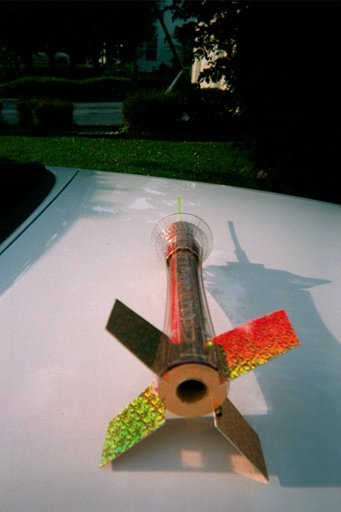
I didn't want to have to glue anything to the clear shell of the daquiri glass, so I decided to make the lower body non-load bearing. I made a plywood ring that was glued to the bottom of the motor tube and rested against the 38mm inner tube, forming a thrust ring. I designed and cut four through-the-wall fins, which were glued to the thrust ring and the 38mm tube. Next, I removed the bottom of the daquiri glass and cut fin slots. The inner tube asembly, with thrust ring and fins, was then slid into the daquiri glass from the bottom.
For the nose cone assembly, I made a plywood bulkhead and inserted an eyebolt. I found that the cardboard core from a used roll of electrical tape fit nicely into the 38mm tubing, so that became the nose cone's shoulder. I then needed something to fashion a spire for the top of the tower. After much scrounging, I found a plastic plug that fit tightly into the top of the daquiri glass. I also grabbed a section of plastic tubing (originally bought as launch lug stock) that fit over the end of the eyebolt. I drilled the plug so the tubing fit through and slid these into the front of the nose. Finally, I cut a hole in the nose cone's shell for the launch rod to pass through.
A section of Kevlar string, a chunk of tubing for a launch lug, and the basic construction of the Stratosphere was complete.
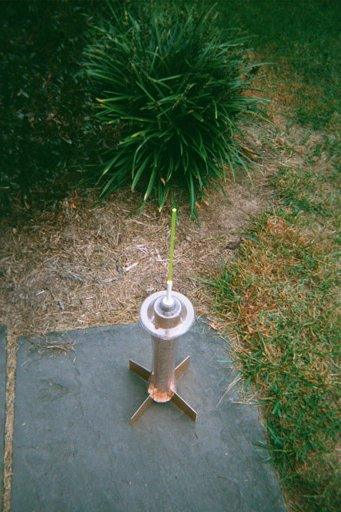
I thought and thought about finishing. Should I paint the components and leave the shell clear? Or, should I paint the shell from the inside? While wandering the aisles in a craft store, I noticed some self-adhesive holographic film and decided that was it. I covered all of the inner tubes and the fins with the film and re-inserted them into the clear outer shell. As a final touch, I bought a small, neon green, see-thru plastic rod that fit nicely into the end of the plastic tube mentioned above. This is interesting looking stuff. It catches ambient light and its tip appears to be lit up - an effect that is somewhat similar to optical fibers. I think this effect is visible in the pic to the right.
 Flight Report:
The Stratosphereflew on 3/10/2001 at the NARHAMS sport launch in Middletown, MD. I first removed the green plastic rod and stuffed some Estes wadding into the tube. I opted to use a 24mm motor for the first launch, so I packed an AT E15-4 into a motor adapter and gave her a try. The rocket weathercocked quite a bit due to 10-15 mph winds and blunt front-end. The flight was fairly low and ejection was a bit late, but was nevertheless successful. For the next flight I think I'll try a small F or G.
Closing Notes:
Well this rocket wasn't all "flounder", but a good portion was. The only thing I bought with this rocket in mind was the holographic film and the green plastic rod. Oh, and the show at the Stratosphere was pretty darn good. It wasn't Zigfried and Roy, but it also was over an order of magnitude cheaper!
Sponsored Ads
 |
 |


